Quantcast
Channel: PostgreSQL research
Viewing all 253 articles
Browse latest View live

使用社区版本pg_dump 逻辑备份导出 EDB PPAS 的风险

$
0
0

阿里云的PPAS产品是一个高度兼容Oracle数据库的产品,有些用户在使用的时候,会有将数据逻辑备份到本地,然后倒入到本地库的需求。
但是PPAS既兼容PostgreSQL又兼容Oracle,用户使用PostgreSQL社区自带的pg_dump导出工具也能导出PPAS的数据。
那么问题来了,使用pg_dump导出会有什么问题吗?
PPAS为了兼容Oracle,自带了一些系统表,这些系统表在PostgreSQL中并不是系统表,pg_dump会把这些表的数据导出。
例如dual表

 sys    | dual                      | table | pg746347

使用pg_dump导出的备份文件,导入到EDB PPAS中,dual表的记录也会导进去,这样就出问题了,dual表变成了2条记录。
除了dual表的问题,还可能会有其他的问题。
因此建议PPAS的用户,如果要对数据库进行逻辑的导出和导入,建议使用ppas提供的逻辑导出和导入工具,而不要使用PostgreSQL社区版本的pg_dump和pg_restore。


PostgreSQL 批量权限 管理方法

$
0
0

关于PostgreSQL的逻辑架构和权限体系,可以参考
https://yq.aliyun.com/articles/41210
本文将给大家介绍一下如何批量管理表,视图,物化视图的权限。
以及如何管理默认权限,批量赋予schema的权限。

对整个schema的对象进行权限管理

PostgreSQL 从9.0开始就提供了比较方便的对整个schema的指定对象赋权给目标用的语法。
http://www.postgresql.org/docs/9.5/static/sql-grant.html
例子

GRANT { { SELECT | INSERT | UPDATE | DELETE | TRUNCATE | REFERENCES | TRIGGER }
    [, ...] | ALL [ PRIVILEGES ] }
    ON { [ TABLE ] table_name [, ...]
         | ALL TABLES IN SCHEMA schema_name [, ...] }
    TO role_specification [, ...] [ WITH GRANT OPTION ]

REVOKE [ GRANT OPTION FOR ]
    { { SELECT | INSERT | UPDATE | DELETE | TRUNCATE | REFERENCES | TRIGGER }
    [, ...] | ALL [ PRIVILEGES ] }
    ON { [ TABLE ] table_name [, ...]
         | ALL TABLES IN SCHEMA schema_name [, ...] }
    FROM { [ GROUP ] role_name | PUBLIC } [, ...]
    [ CASCADE | RESTRICT ]

将schema digoal下的所有表的select,update权限赋予给test用户。
注意
如果digoal.*中包含了非当前用户的表,并且当前用户非超级用户,并且当前用户没有这些表的select,update的with grant option权限。将报错。
换句话说,如果要确保这个赋权操作万无一失,可以选择使用超级用户来执行。

grant select,update on all tables in schema digoal to test;  

将schema digoal下的所有表的select,update权限从test用户回收。

revoke select,update on all tables in schema digoal from test;  

在对整个schema下的所有对象的权限管理完后, 别忘记了在对象之上,还需要对schema、database、instance进行相应的赋权。

如何设置用户创建的对象的默认权限

另一个问题,如何设置用户新建的对象的默认权限?
在PostgreSQL 9.0以后新加的语法:
http://www.postgresql.org/docs/9.5/static/sql-alterdefaultprivileges.html
例如

ALTER DEFAULT PRIVILEGES
    [ FOR { ROLE | USER } target_role [, ...] ]
    [ IN SCHEMA schema_name [, ...] ]
    abbreviated_grant_or_revoke

where abbreviated_grant_or_revoke is one of:

GRANT { { SELECT | INSERT | UPDATE | DELETE | TRUNCATE | REFERENCES | TRIGGER }
    [, ...] | ALL [ PRIVILEGES ] }
    ON TABLES
    TO { [ GROUP ] role_name | PUBLIC } [, ...] [ WITH GRANT OPTION ]

例子:
将digoal用户未来在public下面创建的表的select,update权限默认赋予给test用户.

postgres=> alter default privileges for role digoal in schema public grant select,update on tables to test;
ALTER DEFAULT PRIVILEGES

将test用户未来在public,digoal下面创建的表的select,update权限默认赋予给digoal用户.

postgres=# alter default privileges for role test in schema public,digoal grant select,update on tables to digoal;
ALTER DEFAULT PRIVILEGES

查看已经赋予的默认权限

postgres=> \ddp+
               Default access privileges
  Owner   | Schema | Type  |     Access privileges     
----------+--------+-------+---------------------------
 digoal   | public | table | test=rw/digoal
 test     | digoal | table | digoal=rw/test
 test     | public | table | digoal=rw/test

SELECT pg_catalog.pg_get_userbyid(d.defaclrole) AS "Owner",
  n.nspname AS "Schema",
  CASE d.defaclobjtype WHEN 'r' THEN 'table' WHEN 'S' THEN 'sequence' WHEN 'f' THEN 'function' WHEN 'T' THEN 'type' END AS "Type",
  pg_catalog.array_to_string(d.defaclacl, E'\n') AS "Access privileges"
FROM pg_catalog.pg_default_acl d
     LEFT JOIN pg_catalog.pg_namespace n ON n.oid = d.defaclnamespace
ORDER BY 1, 2, 3;

  Owner   | Schema | Type  |     Access privileges     
----------+--------+-------+---------------------------
 digoal   | public | table | test=rw/digoal
 postgres |        | table | postgres=arwdDxt/postgres+
          |        |       | digoal=arwdDxt/postgres
 test     | digoal | table | digoal=rw/test
 test     | public | table | digoal=rw/test
(4 rows)

如何定制批量管理权限

将"指定用户" owne 的表、视图、物化视图的"指定权限"赋予给"指定用户",并排除"指定对象"
这个需求需要写一个函数来完成,如下

create or replace function g_or_v
(
  g_or_v text,   -- 输入 grant or revoke 表示赋予或回收
  own name,      -- 指定用户 owner 
  target name,   -- 赋予给哪个目标用户 grant privilege to who?
  objtyp text,   --  对象类别: 表, 物化视图, 视图 object type 'r', 'v' or 'm', means table,view,materialized view
  exp text[],    --  排除哪些对象, 用数组表示, excluded objects
  priv text      --  权限列表, privileges, ,splits, like 'select,insert,update'
) returns void as $$
declare
  nsp name;
  rel name;
  sql text;
  tmp_nsp name := '';
begin
  for nsp,rel in select t2.nspname,t1.relname from pg_class t1,pg_namespace t2 where t1.relkind=objtyp and t1.relnamespace=t2.oid and t1.relowner=(select oid from pg_roles where rolname=own)
  loop
    if (tmp_nsp = '' or tmp_nsp <> nsp) and lower(g_or_v)='grant' then
      -- auto grant schema to target user
      sql := 'GRANT usage on schema "'||nsp||'" to '||target;
      execute sql;
      raise notice '%', sql;
    end if;

    tmp_nsp := nsp;

    if (exp is not null and nsp||'.'||rel = any (exp)) then
      raise notice '% excluded % .', g_or_v, nsp||'.'||rel;
    else
      if lower(g_or_v) = 'grant' then
        sql := g_or_v||' '||priv||' on "'||nsp||'"."'||rel||'" to '||target ;
      elsif lower(g_or_v) = 'revoke' then
        sql := g_or_v||' '||priv||' on "'||nsp||'"."'||rel||'" from '||target ;
      else
        raise notice 'you must enter grant or revoke';
      end if;
      raise notice '%', sql;
      execute sql;
    end if;
  end loop;
end;
$$ language plpgsql;  

例子
将digoal用户的所有表(除了'public.test'和'public.abc')的select, update权限赋予给test用户.

postgres=# select g_or_v('grant', 'digoal', 'test', 'r', array['public.test', 'public.abc'], 'select, update');
NOTICE:  GRANT usage on schema "public" to test
NOTICE:  grant select, update on "public"."tb1l" to test
NOTICE:  grant select, update on "public"."new" to test
 g_or_v 
--------

(1 row)

postgres=# \dp+ public.tb1l 
                            Access privileges
 Schema | Name | Type  | Access privileges | Column privileges | Policies 
--------+------+-------+-------------------+-------------------+----------
 public | tb1l | table | test=rw/digoal    |                   | 
(1 row)
postgres=# \dp+ public.new
                              Access privileges
 Schema | Name | Type  |   Access privileges   | Column privileges | Policies 
--------+------+-------+-----------------------+-------------------+----------
        |      |       | test=rw/digoal        |                   | 
(1 row)

从 test 用户回收digoal用户的所有表(除了'public.test'和'public.abc')的update权限.

postgres=# select g_or_v('revoke', 'digoal', 'test', 'r', array['public.test', 'public.abc'], 'update');
NOTICE:  revoke update on "public"."tb1l" from test
NOTICE:  revoke update on "public"."new" from test
 g_or_v 
--------

(1 row)

postgres=# \dp+ public.tb1l 
                            Access privileges
 Schema | Name | Type  | Access privileges | Column privileges | Policies 
--------+------+-------+-------------------+-------------------+----------
 public | tb1l | table | test=r/digoal     |                   | 
(1 row)

postgres=# \dp+ public.new
                              Access privileges
 Schema | Name | Type  |   Access privileges   | Column privileges | Policies 
--------+------+-------+-----------------------+-------------------+----------
        |      |       | test=r/digoal         |                   | 
(1 row)

希望这个例子对PostgreSQL的用户有帮助。

PostgreSQL MySQL 兼容性之 - 读写用户的只读影子用户

$
0
0

在一些企业里面,通常会在数据库中创建一些只读用户,这些只读用户可以查看某些用户的对象,但是不能修改或删除这些对象的数据。
这种用户通常可以给开发人员,运营人员使用,或者数据分析师 等角色的用户使用。
因为他们可能关注的是数据本身,并且为了防止他们误操作修改或删除线上的数据,所以限制他们的用户只有只读的权限。
MySQL这块的管理应该非常方便。
其实PostgreSQL管理起来也很方便。
用户可以先参考我前面写的两篇文章
PostgreSQL 逻辑结构 和 权限体系 介绍
https://yq.aliyun.com/articles/41210

PostgreSQL 批量权限 管理方法
https://yq.aliyun.com/articles/41512

PostgreSQL schema,database owner 的高危注意事项
https://yq.aliyun.com/articles/41514
建议用户使用超级用户创建schema和database,然后再把schema和database的读写权限给普通用户,这样就不怕被误删了。因为超级用户本来就有所有权限。

为了满足本文的需求, 创建读写用户的只读影子用户

1. 使用超级用户创建读写账号,创建数据库, 创建schema

postgres=# create role appuser login;
CREATE ROLE

postgres=# create database appuser;

postgres=# \c appuser postgres
appuser=# create schema appuser;  -- 使用超级用户创建schema

赋权
appuser=# grant connect on database to appuser;  -- 只赋予连接权限
appuser=# grant all on schema appuser to appuser;  -- 值赋予读和写权限

2. 假设该读写账号已经创建了一些对象

\c appuser appuser
appuser=> create table tbl1(id int);
CREATE TABLE
appuser=> create table tbl2(id int);
CREATE TABLE
appuser=> create table tbl3(id int);
CREATE TABLE

3. 创建只读影子账号

postgres=# create role ro login;
CREATE ROLE

postgres=# \c appuser postgres
appuser=# grant connect on database appuser to ro;
appuser=# grant usage on schema appuser to ro;

4. 创建隐藏敏感信息的视图

假设tbl2是敏感信息表,需要加密后给只读用户看

\c appuser appuser
appuser=> create view v as select md5(id::text) from tbl2;
CREATE VIEW

5. 修改已有权限

创建权限管理函数  
\c appuser appuser
appuser=> create or replace function g_or_v
(
  g_or_v text,   -- 输入 grant or revoke 表示赋予或回收
  own name,      -- 指定用户 owner 
  target name,   -- 赋予给哪个目标用户 grant privilege to who?
  objtyp text,   --  对象类别: 表, 物化视图, 视图 object type 'r', 'v' or 'm', means table,view,materialized view
  exp text[],    --  排除哪些对象, 用数组表示, excluded objects
  priv text      --  权限列表, privileges, ,splits, like 'select,insert,update'
) returns void as $$
declare
  nsp name;
  rel name;
  sql text;
  tmp_nsp name := '';
begin
  for nsp,rel in select t2.nspname,t1.relname from pg_class t1,pg_namespace t2 where t1.relkind=objtyp and t1.relnamespace=t2.oid and t1.relowner=(select oid from pg_roles where rolname=own)
  loop
    if (tmp_nsp = '' or tmp_nsp <> nsp) and lower(g_or_v)='grant' then
      -- auto grant schema to target user
      sql := 'GRANT usage on schema "'||nsp||'" to '||target;
      execute sql;
      raise notice '%', sql;
    end if;

    tmp_nsp := nsp;

    if (exp is not null and nsp||'.'||rel = any (exp)) then
      raise notice '% excluded % .', g_or_v, nsp||'.'||rel;
    else
      if lower(g_or_v) = 'grant' then
        sql := g_or_v||' '||priv||' on "'||nsp||'"."'||rel||'" to '||target ;
      elsif lower(g_or_v) = 'revoke' then
        sql := g_or_v||' '||priv||' on "'||nsp||'"."'||rel||'" from '||target ;
      else
        raise notice 'you must enter grant or revoke';
      end if;
      raise notice '%', sql;
      execute sql;
    end if;
  end loop;
end;
$$ language plpgsql;  

appuser=> select g_or_v('grant', 'appuser', 'ro', 'r', array['public.tbl2'], 'select');
WARNING:  no privileges were granted for "public"
CONTEXT:  SQL statement "GRANT usage on schema "public" to ro"
PL/pgSQL function g_or_v(text,name,name,text,text[],text) line 13 at EXECUTE
NOTICE:  GRANT usage on schema "public" to ro
NOTICE:  grant select on "public"."tbl1" to ro
NOTICE:  grant excluded public.tbl2 .
NOTICE:  grant select on "public"."tbl3" to ro
 g_or_v 
--------

(1 row)

另外还提供了一种方法,但是一定要指定schema,所以用户自己要注意,如果要对所有schema操作,需要把所有的schema都写进去。  

grant select on all tables in schema public,schema1,schema2,schema3 to ro;  

并且这种方法还有一个弊端,如果这些schema下面有其他用户创建的对象,也会被赋予,如果赋权的账号没有权限,则会报错。  
所以还是建议使用我提供的函数来操作  

6. 回收敏感表的权限

因为前面已经排除赋予了,所以不需要回收

7. 修改新建对象的默认权限

appuser=> alter default privileges for role appuser grant select on tables to ro;
ALTER DEFAULT PRIVILEGES
appuser=> \ddp+
               Default access privileges
  Owner   | Schema | Type  |     Access privileges     
----------+--------+-------+---------------------------
 appuser  |        | table | appuser=arwdDxt/appuser  +
          |        |       | ro=r/appuser

8. 未来如果有新增的敏感表,先创建视图,同时回收表的权限

appuser=> create table tbl4(id int);
CREATE TABLE
appuser=> create view v2 as select md5(id::text) from tbl4;
CREATE VIEW
appuser=> revoke select on tbl4 from ro;
REVOKE

权限检查

appuser=> \dp+ v2
                               Access privileges
 Schema | Name | Type |    Access privileges    | Column privileges | Policies 
--------+------+------+-------------------------+-------------------+----------
 public | v2   | view | appuser=arwdDxt/appuser+|                   | 
        |      |      | ro=r/appuser            |                   | 
(1 row)

希望本文对PostgreSQL用户有所帮助

PostgreSQL schema,database owner 的高危注意事项

$
0
0

云用户反映的一个问题,引发一系列安全思考。
以下是创建PostgreSQL schema的语法说明页的一个note:
http://www.postgresql.org/docs/9.5/static/sql-createschema.html

According to the SQL standard, the owner of a schema always owns all objects within it. 
PostgreSQL allows schemas to contain objects owned by users other than the schema owner. 
This can happen only if the schema owner grants the CREATE privilege on his schema to someone else, or a superuser chooses to create objects in it.  

schema的owner默认是该schema下的所有对象的owner。
同时PostgreSQL还允许用户在别人的schema下创建对象,所以一个对象可能属于"两个"owner。
更"糟糕"的是schema 的owner有 drop该schema下面的所有对象的权限。

所以千万不要把自己的对象创建到别人的schema下面,那很危险。
看个例子,
r1创建了一个schema r1, 并把这个schema的写权限给了r2。
然后r2和超级用户postgres分别在r1这个schema下面创建了一个表。
然后r1可以把r2和postgres在r1 schema下创建的表删掉,然后就没有然后了。

postgres=# create role r1 login;
CREATE ROLE
postgres=# create role r2 login;
CREATE ROLE

postgres=# grant all on database postgres to r1;
GRANT
postgres=# grant all on database postgres to r2;
GRANT

postgres=# \c postgres r1;
postgres=> create schema r1;
CREATE SCHEMA
postgres=> grant all on schema r1 to r2;
GRANT

postgres=> \c postgres r2;
postgres=> create table r1.t(id int);
CREATE TABLE

postgres=> \c postgres postgres
postgres=# create table r1.t1(id int);
CREATE TABLE

postgres=# \c postgres r1
postgres=> drop table r1.t;
DROP TABLE
postgres=> drop table r1.t1;
DROP TABLE

或者直接drop schema cascade来删除整个schema.  

对于database的owner也存在这个问题,它同样具有删除database中任何其他用户创建的对象的权力。
例子:

普通用户r1创建的数据库
postgres=> \c postgres r1
You are now connected to database "postgres" as user "r1".
postgres=> create database db1;
CREATE DATABASE
postgres=> grant all on database db1 to r2;
GRANT

其他用户在这个数据库中创建对象
postgres=> \c db1 r2
You are now connected to database "db1" as user "r2".
db1=> create schema r2;
CREATE SCHEMA
db1=> create table r2.t(id int);
CREATE TABLE
db1=> insert into t select generate_series(1,100);
INSERT 0 100

db1=> \c db1 postgres
You are now connected to database "db1" as user "postgres".
db1=# create table t(id int);
CREATE TABLE
db1=# insert into t select generate_series(1,100);
INSERT 0 100

数据库的OWNER不能直接删数据库中的对象
postgres=> \c db1 r1
You are now connected to database "db1" as user "r1".
db1=> drop table r2.t ;
ERROR:  permission denied for schema r2
db1=> drop table public.t ;
ERROR:  must be owner of relation t
db1=> drop schema r2;
ERROR:  must be owner of schema r2
db1=> drop schema public;
ERROR:  must be owner of schema public
db1=> \c postgres r1
You are now connected to database "postgres" as user "r1".
postgres=> drop database r1;
ERROR:  database "r1" does not exist

但是可以直接删库
postgres=> drop database db1;
DROP DATABASE

建议社区可以改进一下这个权限管理的风格。
例如drop schema时,如果发现schema里面有不属于当前schema owner的对象,则发出警告,并且不删除,另外加一个语法, 支持force, 发出notice并删除之。
对于drop database也是这样。

安全建议

介于此,我建议用户使用超级用户创建schema和database,然后再把schema和database的读写权限给普通用户,这样就不怕被误删了。因为超级用户本来就有所有权限。

还有一种方法是创建事件触发器,当执行drop 命令时,只有owner和超级用户能删对应的对象。

PostgreSQL 获取拼音首字母的函数 - 摘自互联网

$
0
0

获取中文拼音首字母的,用到了编码顺序来简化,还有优化空间。

CREATE FUNCTION func_chinese_spell(str VARCHAR(2000)) RETURNS VARCHAR(2000) AS $$
DECLARE
word NCHAR(1);
code VARCHAR(2000);
i INTEGER;
chnstr VARCHAR(2000);
BEGIN 
code := '';
i := 1;
chnstr := str;
WHILE LENGTH(chnstr)>0 LOOP
word := SUBSTRING(str,i,1); 
code := code || CASE WHEN (ASCII(word) BETWEEN 19968 AND 19968+20901) THEN
(
SELECT p FROM
(
SELECT 'A' as p,N'驁' as w 
UNION ALL SELECT 'B',N'簿' 
UNION ALL SELECT 'C',N'錯' 
UNION ALL SELECT 'D',N'鵽' 
UNION ALL SELECT 'E',N'樲' 
UNION ALL SELECT 'F',N'鰒' 
UNION ALL SELECT 'G',N'腂' 
UNION ALL SELECT 'H',N'夻' 
UNION ALL SELECT 'J',N'攈' 
UNION ALL SELECT 'K',N'穒' 
UNION ALL SELECT 'L',N'鱳' 
UNION ALL SELECT 'M',N'旀' 
UNION ALL SELECT 'N',N'桛' 
UNION ALL SELECT 'O',N'漚' 
UNION ALL SELECT 'P',N'曝' 
UNION ALL SELECT 'Q',N'囕' 
UNION ALL SELECT 'R',N'鶸' 
UNION ALL SELECT 'S',N'蜶' 
UNION ALL SELECT 'T',N'籜' 
UNION ALL SELECT 'W',N'鶩' 
UNION ALL SELECT 'X',N'鑂' 
UNION ALL SELECT 'Y',N'韻' 
UNION ALL SELECT 'Z',N'咗' 
) T 
WHERE w>=word ORDER BY p ASC LIMIT 1
) 
ELSE word END;
i := i + 1;
chnstr := SUBSTRING(str,i,LENGTH(str)-i + 1);
END LOOP;

RETURN code;
END; 
$$LANGUAGE plpgsql;
2014,swish,原版首发:http://blog.qdac.cc/?p=1281,自由使用,保留版权
CREATE OR REPLACE FUNCTION CnFirstChar(s character varying)
  RETURNS character varying AS
$BODY$
declare
  retval character varying;
  c character varying;
  l integer;
  b bytea;  
  w integer;
begin
l=length(s);
retval='';
while l>0 loop
  c=left(s,1);
  b=convert_to(c,'GB18030')::bytea;
  if get_byte(b,0)<127 then
    retval=retval || upper(c);
  elsif length(b)=2 then
    begin
    w=get_byte(b,0)*256+get_byte(b,1);
    --汉字GBK编码按拼音排序,按字符数来查找,基于概率来说,效率应该比挨个强:)
    if w between 48119 and 49061 then --"J";48119;49061;942
      retval=retval || 'J';
    elsif w between 54481 and 55289 then --"Z";54481;55289;808
      retval=retval || 'Z';
    elsif w between 53689 and 54480 then --"Y";53689;54480;791
      retval=retval || 'Y';
    elsif w between 51446 and 52208 then --"S";51446;52208;762
      retval=retval || 'S';
    elsif w between 52980 and 53640 then --"X";52980;53640;660
      retval=retval || 'X';
    elsif w between 49324 and 49895 then --"L";49324;49895;571
      retval=retval || 'L';
    elsif w between 45761 and 46317 then --"C";45761;46317;556
      retval=retval || 'C';
    elsif w between 45253 and 45760 then --"B";45253;45760;507
      retval=retval || 'B';
    elsif w between 46318 and 46825 then --"D";46318;46825;507
      retval=retval || 'D';
    elsif w between 47614 and 48118 then --"H";47614;48118;504
      retval=retval || 'H';
    elsif w between 50906 and 51386 then --"Q";50906;51386;480
      retval=retval || 'Q';
    elsif w between 52218 and 52697 then --"T";52218;52697;479
      retval=retval || 'T';
    elsif w between 49896 and 50370 then --"M";49896;50370;474
      retval=retval || 'M';
    elsif w between 47297 and 47613 then --"G";47297;47613;316
      retval=retval || 'G';
    elsif w between 47010 and 47296 then--"F";47010;47296;286
      retval=retval || 'F';
    elsif w between 50622 and 50905 then--"P";50622;50905;283
      retval=retval || 'P';
    elsif w between 52698 and 52979 then--"W";52698;52979;281
      retval=retval || 'W';
    elsif w between 49062 and 49323 then--"K";49062;49323;261
      retval=retval || 'K';
    elsif w between 50371 and 50613 then --"N";50371;50613;242
      retval=retval || 'N';
    elsif w between 46826 and 47009 then--"E";46826;47009;183
      retval=retval || 'E';
    elsif w between 51387 and 51445 then--"R";51387;51445;58
      retval=retval || 'R';
    elsif w between 45217 and 45252 then --"A";45217;45252;35
      retval=retval || 'A';
    elsif w between 50614 and 50621 then --"O";50614;50621;7
      retval=retval || 'O';
    end if;
    end;
  end if;
  s=substring(s,2,l-1);
  l=l-1;
end loop;
return retval;
end;
$BODY$
  LANGUAGE plpgsql IMMUTABLE;
代码如下: 
--函数 
CREATE function fn_GetPy(@str nvarchar(4000)) 
returns nvarchar(4000) 
--WITH ENCRYPTION 
as 
begin 
declare @intLenint 
declare @strRetnvarchar(4000) 
declare @temp nvarchar(100) 
set @intLen = len(@str) 
set @strRet = '' 
while @intLen > 0 
begin 
set @temp = '' 
select @temp = case 
when substring(@str,@intLen,1) >= '帀' then 'Z' 
when substring(@str,@intLen,1) >= '丫' then 'Y' 
when substring(@str,@intLen,1) >= '夕' then 'X' 
when substring(@str,@intLen,1) >= '屲' then 'W' 
when substring(@str,@intLen,1) >= '他' then 'T' 
when substring(@str,@intLen,1) >= '仨' then 'S' 
when substring(@str,@intLen,1) >= '呥' then 'R' 
when substring(@str,@intLen,1) >= '七' then 'Q' 
when substring(@str,@intLen,1) >= '妑' then 'P' 
when substring(@str,@intLen,1) >= '噢' then 'O' 
when substring(@str,@intLen,1) >= '拏' then 'N' 
when substring(@str,@intLen,1) >= '嘸' then 'M' 
when substring(@str,@intLen,1) >= '垃' then 'L' 
when substring(@str,@intLen,1) >= '咔' then 'K' 
when substring(@str,@intLen,1) >= '丌' then 'J' 
when substring(@str,@intLen,1) >= '铪' then 'H' 
when substring(@str,@intLen,1) >= '旮' then 'G' 
when substring(@str,@intLen,1) >= '发' then 'F' 
when substring(@str,@intLen,1) >= '妸' then 'E' 
when substring(@str,@intLen,1) >= '咑' then 'D' 
when substring(@str,@intLen,1) >= '嚓' then 'C' 
when substring(@str,@intLen,1) >= '八' then 'B' 
when substring(@str,@intLen,1) >= '吖' then 'A' 
else rtrim(ltrim(substring(@str,@intLen,1))) 
end 
--对于汉字特殊字符,不生成拼音码 
if (ascii(@temp)>127) set @temp = '' 
--对于英文中小括号,不生成拼音码 
if @temp = '(' or @temp = ')' set @temp = '' 
select @strRet = @temp + @strRet 
set @intLen = @intLen - 1 
end 
return lower(@strRet) 
end 
go 
--调用 
select dbo.fn_getpy('张三') 
--返回:zs 
答!: 2: 
取汉字拼音首字母的存储过程 
Create function fun_getPY ( @str nvarchar(4000) ) 
returns nvarchar(4000) 
as 
begin 
declare @word nchar(1),@PY nvarchar(4000) 
set @PY='' 
while len(@str)>0 
begin 
set @word=left(@str,1) 
--如果非汉字字符,返回原字符 
set @PY=@PY+(case when unicode(@word) between 19968 and 19968+20901 
then ( 
select top 1 PY 
from 
( 
select 'A' as PY,N'驁' as word 
union all select 'B',N'簿' 
union all select 'C',N'錯' 
union all select 'D',N'鵽' 
union all select 'E',N'樲' 
union all select 'F',N'鰒' 
union all select 'G',N'腂' 
union all select 'H',N'夻' 
union all select 'J',N'攈' 
union all select 'K',N'穒' 
union all select 'L',N'鱳' 
union all select 'M',N'旀' 
union all select 'N',N'桛' 
union all select 'O',N'漚' 
union all select 'P',N'曝' 
union all select 'Q',N'囕' 
union all select 'R',N'鶸' 
union all select 'S',N'蜶' 
union all select 'T',N'籜' 
union all select 'W',N'鶩' 
union all select 'X',N'鑂' 
union all select 'Y',N'韻' 
union all select 'Z',N'咗' 
) T 
where word>=@word collate Chinese_PRC_CS_AS_KS_WS 
order by PY ASC 
) 
else @word 
end) 
set @str=right(@str,len(@str)-1) 
end 
return @PY 
end 

PostgreSQL 标签系统 bit 位运算 查询性能

$
0
0

在标签系统中,通常会有多个属性,每个属性使用一个标签标示,最简单的标签是用0和1来表示,代表true和false。
我们可以把所有的标签转换成比特位,例如系统中一共有200个标签,5000万用户。
那么我们可以通过标签的位运算来圈定特定的人群。
这样就会涉及BIT位的运算。
那么我们来看看PostgreSQL位运算的性能如何?
PostgreSQL 9.5

postgres=# create table t_bit2 (id bit(200));
CREATE TABLE
Time: 1.018 ms
postgres=# insert into t_bit2 select B'10101010101010101010101010101010101010101010101010101010101010101010101010101010101010101010101010101010101010101010101010101010101010101010101010101010101010101010101010101010101010101010101010101010' from generate_series(1,50000000);
INSERT 0 50000000
Time: 47203.497 ms
postgres=# select count(*) from t_bit2 where bitand(id, '10101010101010101010101010101010101010101010101010101010101010101010101010101010101010101010101010101010101010101010101010101010101010101010101010101010101010101010101010101010101010101010101010101010')=B'10101010101010101010101010101010101010101010101010101010101010101010101010101010101010101010101010101010101010101010101010101010101010101010101010101010101010101010101010101010101010101010101010101010';
  count   
----------
 50000000
(1 row)

Time: 14216.286 ms
postgres=# \dt+ t_bit2
                     List of relations
 Schema |  Name  | Type  |  Owner   |  Size   | Description 
--------+--------+-------+----------+---------+-------------
 public | t_bit2 | table | postgres | 2873 MB | 
(1 row)

PostgreSQL 9.6支持并行查询

postgres=#  create table t_bit2 (id bit(200));
CREATE TABLE
Time: 0.933 ms
postgres=# insert into t_bit2 select B'10101010101010101010101010101010101010101010101010101010101010101010101010101010101010101010101010101010101010101010101010101010101010101010101010101010101010101010101010101010101010101010101010101010' from generate_series(1,50000000);
INSERT 0 50000000
Time: 51485.962 ms
postgres=# explain (analyze,verbose,timing,costs,buffers) select count(*) from t_bit2 where bitand(id, '10101010101010101010101010101010101010101010101010101010101010101010101010101010101010101010101010101010101010101010101010101010101010101010101010101010101010101010101010101010101010101010101010101010')=B'10101010101010101010101010101010101010101010101010101010101010101010101010101010101010101010101010101010101010101010101010101010101010101010101010101010101010101010101010101010101010101010101010101010';
                                                                                                                                                                                                                                        QUERY
 PLAN                                                                                                                                                                                                                                        
---------------------------------------------------------------------------------------------------------------------------------------------------------------------------------------------------------------------------------------------
---------------------------------------------------------------------------------------------------------------------------------------------------------------------------------------------------------------------------------------------
 Finalize Aggregate  (cost=471554.70..471554.71 rows=1 width=8) (actual time=9667.464..9667.465 rows=1 loops=1)
   Output: count(*)
   Buffers: shared hit=368140 dirtied=145199
   ->  Gather  (cost=471554.07..471554.68 rows=6 width=8) (actual time=9667.433..9667.454 rows=7 loops=1)
         Output: (PARTIAL count(*))
         Workers Planned: 6
         Workers Launched: 6
         Buffers: shared hit=368140 dirtied=145199
         ->  Partial Aggregate  (cost=470554.07..470554.08 rows=1 width=8) (actual time=9663.423..9663.424 rows=1 loops=7)
               Output: PARTIAL count(*)
               Buffers: shared hit=367648 dirtied=145199
               Worker 0: actual time=9662.545..9662.546 rows=1 loops=1
                 Buffers: shared hit=49944 dirtied=19645
               Worker 1: actual time=9661.922..9661.922 rows=1 loops=1
                 Buffers: shared hit=49405 dirtied=19198
               Worker 2: actual time=9662.924..9662.925 rows=1 loops=1
                 Buffers: shared hit=49968 dirtied=19641
               Worker 3: actual time=9662.483..9662.484 rows=1 loops=1
                 Buffers: shared hit=49301 dirtied=19403
               Worker 4: actual time=9663.341..9663.342 rows=1 loops=1
                 Buffers: shared hit=49825 dirtied=19814
               Worker 5: actual time=9663.605..9663.605 rows=1 loops=1
                 Buffers: shared hit=49791 dirtied=19586
               ->  Parallel Seq Scan on public.t_bit2  (cost=0.00..470468.39 rows=34274 width=0) (actual time=0.039..5724.642 rows=7142857 loops=7)
                     Output: id
                     Filter: (bitand(t_bit2.id, B'1010101010101010101010101010101010101010101010101010101010101010101010101010101010101010101010101010101010101010101010101010101010101010101010101010101010101010101010101010101010101010101
0101010101010'::"bit") = B'10101010101010101010101010101010101010101010101010101010101010101010101010101010101010101010101010101010101010101010101010101010101010101010101010101010101010101010101010101010101010101010101010101010'::"bit")
                     Buffers: shared hit=367648 dirtied=145199
                     Worker 0: actual time=0.038..5676.776 rows=6792384 loops=1
                       Buffers: shared hit=49944 dirtied=19645
                     Worker 1: actual time=0.046..5675.846 rows=6719080 loops=1
                       Buffers: shared hit=49405 dirtied=19198
                     Worker 2: actual time=0.040..5678.657 rows=6795648 loops=1
                       Buffers: shared hit=49968 dirtied=19641
                     Worker 3: actual time=0.037..5678.587 rows=6704936 loops=1
                       Buffers: shared hit=49301 dirtied=19403
                     Worker 4: actual time=0.039..5667.813 rows=6776072 loops=1
                       Buffers: shared hit=49825 dirtied=19814
                     Worker 5: actual time=0.051..5677.367 rows=6771576 loops=1
                       Buffers: shared hit=49791 dirtied=19586
 Planning time: 0.100 ms
 Execution time: 9772.925 ms
(41 rows)
Time: 9773.874 ms
postgres=# select count(*) from t_bit2 where bitand(id, '10101010101010101010101010101010101010101010101010101010101010101010101010101010101010101010101010101010101010101010101010101010101010101010101010101010101010101010101010101010101010101010101010101010')=B'10101010101010101010101010101010101010101010101010101010101010101010101010101010101010101010101010101010101010101010101010101010101010101010101010101010101010101010101010101010101010101010101010101010';
  count   
----------
 50000000
(1 row)
Time: 2326.541 ms

PostgreSQL 9.6的性能提升:
_

开源数据库PostgreSQL攻克并行计算难题

$
0
0

经过多年的酝酿(从支持work process到支持动态fork共享内存,再到内核层面支持并行计算),PostgreSQL 的并行计算功能终于来了,为PG的scale up能力再次拔高一个台阶,标志着开源数据库已经攻克了并行计算的难题。


相信有很多小伙伴已经开始测试了,我也测试了一个场景是标签系统类应用的比特位运算,昨天测试发现性能相比非并行已经提升了7倍。

调整并行度,在32个核的虚拟机上测试,性能提升了约10多倍。
但是实际上并没有到32倍,不考虑内存和IO的瓶颈,是有优化空间。
注意不同的并行度,效果不一样,目前来看并不是最大并行度就能发挥最好的性能,还需要考虑锁竞争的问题。
把测试表的数据量加载到16亿,共90GB。

postgres=# \dt+
                    List of relations
 Schema |  Name  | Type  |  Owner   | Size  | Description 
--------+--------+-------+----------+-------+-------------
 public | t_bit2 | table | postgres | 90 GB | 
(1 row)

不使用并行的性能如下,耗时 141377.100 毫秒。

postgres=# alter table t_bit2 set (parallel_degree=0);
ALTER TABLE
Time: 0.335 ms
postgres=# select count(*) from t_bit2 ;
   count    
------------
 1600000000
(1 row)
Time: 141377.100 ms

使用17个并行,获得了最好的性能, 耗时9423.257 毫秒。

postgres=# alter table t_bit2 set (parallel_degree=17);
ALTER TABLE
Time: 0.287 ms
postgres=# select count(*) from t_bit2 ;
   count    
------------
 1600000000
(1 row)

Time: 9423.257 ms

并行度为17时,每秒处理的数据量已经达到9.55GB。
与非并行相比,性能达到了15倍,基本上是线性的。
但是可能由于NUMA的原因(并行度增加时, 读数据操作可能会引入较多的__mutex_lock_slowpath, _spin_lock),并行度再加上来性能并不能再线性提升,而是会往下走。
_
另一组测试数据,加入了BIT计算。
32个并行度时,可以获得最好的性能提升,同样也和NUMA有关,为什么并行度能更高呢,因为计算量更大了,扫描冲突可以分担掉。
同样性能比达到了30.9倍,也基本上是线性的。
_

postgres=# alter table t_bit2 set (parallel_degree=32);
ALTER TABLE
Time: 0.341 ms
postgres=# select count(*) from t_bit2 where bitand(id, '10101010101010101010101010101010101010101010101010101010101010101010101010101010101010101010101010101010101010101010101010101010101010101010101010101010101010101010101010101010101010101010101010101010')=B'10101010101010101010101010101010101010101010101010101010101010101010101010101010101010101010101010101010101010101010101010101010101010101010101010101010101010101010101010101010101010101010101010101010';
   count    
------------
 1600000000
(1 row)

Time: 15836.064 ms
postgres=# alter table t_bit2 set (parallel_degree=0);
ALTER TABLE
Time: 0.368 ms
postgres=# select count(*) from t_bit2 where bitand(id, '10101010101010101010101010101010101010101010101010101010101010101010101010101010101010101010101010101010101010101010101010101010101010101010101010101010101010101010101010101010101010101010101010101010')=B'10101010101010101010101010101010101010101010101010101010101010101010101010101010101010101010101010101010101010101010101010101010101010101010101010101010101010101010101010101010101010101010101010101010';
   count    
------------
 1600000000
(1 row)

Time: 488459.158 ms
postgres=# select 488459.158 /15826.358;
      ?column?       
---------------------
 30.8636489835501004
(1 row)

Time: 2.919 ms

后面会再提供tpc-h的测试数据。


那么如何设置并行度呢?决定并行度的几个参数如下
.1. 最大允许的并行度
max_parallel_degree


.2. 表设置的并行度(create table或alter table设置)
parallel_degree
如果设置了表的并行度,则最终并行度取min(max_parallel_degree , parallel_degree )

                /*
                 * Use the table parallel_degree, but don't go further than
                 * max_parallel_degree.
                 */
                parallel_degree = Min(rel->rel_parallel_degree, max_parallel_degree);


.3. 如果表没有设置并行度parallel_degree ,则根据表的大小 和 parallel_threshold 这个硬编码值决定,计算得出(见函数create_plain_partial_paths)
然后依旧受到max_parallel_degree 参数的限制,不能大于它。
代码如下

src/backend/optimizer/util/plancat.c
void
get_relation_info(PlannerInfo *root, Oid relationObjectId, bool inhparent,
                                  RelOptInfo *rel)
{
...
        /* Retrive the parallel_degree reloption, if set. */
        rel->rel_parallel_degree = RelationGetParallelDegree(relation, -1);
...


src/include/utils/rel.h
/*
 * RelationGetParallelDegree
 *              Returns the relation's parallel_degree.  Note multiple eval of argument!
 */
#define RelationGetParallelDegree(relation, defaultpd) \
        ((relation)->rd_options ? \
         ((StdRdOptions *) (relation)->rd_options)->parallel_degree : (defaultpd))


src/backend/optimizer/path/allpaths.c
/*
 * create_plain_partial_paths
 *        Build partial access paths for parallel scan of a plain relation
 */
static void
create_plain_partial_paths(PlannerInfo *root, RelOptInfo *rel)
{
        int                     parallel_degree = 1;

        /*
         * If the user has set the parallel_degree reloption, we decide what to do
         * based on the value of that option.  Otherwise, we estimate a value.
         */
        if (rel->rel_parallel_degree != -1)
        {
                /*
                 * If parallel_degree = 0 is set for this relation, bail out.  The
                 * user does not want a parallel path for this relation.
                 */
                if (rel->rel_parallel_degree == 0)
                        return;

                /*
                 * Use the table parallel_degree, but don't go further than
                 * max_parallel_degree.
                 */
                parallel_degree = Min(rel->rel_parallel_degree, max_parallel_degree);
        }
        else
        {
                int                     parallel_threshold = 1000;

                /*
                 * If this relation is too small to be worth a parallel scan, just
                 * return without doing anything ... unless it's an inheritance child.
                 * In that case, we want to generate a parallel path here anyway.  It
                 * might not be worthwhile just for this relation, but when combined
                 * with all of its inheritance siblings it may well pay off.
                 */
                if (rel->pages < parallel_threshold &&
                        rel->reloptkind == RELOPT_BASEREL)
                        return;
// 表级并行度没有设置时,通过表的大小和parallel_threshold 计算并行度  
                /*
                 * Limit the degree of parallelism logarithmically based on the size
                 * of the relation.  This probably needs to be a good deal more
                 * sophisticated, but we need something here for now.
                 */
                while (rel->pages > parallel_threshold * 3 &&
                           parallel_degree < max_parallel_degree)
                {
                        parallel_degree++;
                        parallel_threshold *= 3;
                        if (parallel_threshold >= PG_INT32_MAX / 3)
                                break;
                }
        }

        /* Add an unordered partial path based on a parallel sequential scan. */
        add_partial_path(rel, create_seqscan_path(root, rel, NULL, parallel_degree));
}


其他测试数据:

增加到32个并行,和硬件有关,并不一定是并行度最高时,性能就最好,前面已经分析了,一定要找到每个查询的拐点。  
postgres=# alter table t_bit2 set (parallel_degree =32);

postgres=# explain (analyze,verbose,timing,costs,buffers) select count(*) from t_bit2 where bitand(id, '10101010101010101010101010101010101010101010101010101010101010101010101010101010101010101010101010101010101010101010101010101010101010101010101010101010101010101010101010101010101010101010101010101010')=B'10101010101010101010101010101010101010101010101010101010101010101010101010101010101010101010101010101010101010101010101010101010101010101010101010101010101010101010101010101010101010101010101010101010';
                                                                                                                                                                                                                                        QUERY
 PLAN                                                                                                                                                                                                                                        
---------------------------------------------------------------------------------------------------------------------------------------------------------------------------------------------------------------------------------------------
---------------------------------------------------------------------------------------------------------------------------------------------------------------------------------------------------------------------------------------------
 Finalize Aggregate  (cost=1551053.25..1551053.26 rows=1 width=8) (actual time=31092.551..31092.552 rows=1 loops=1)
   Output: count(*)
   Buffers: shared hit=1473213
   ->  Gather  (cost=1551049.96..1551053.17 rows=32 width=8) (actual time=31060.939..31092.469 rows=33 loops=1)
         Output: (PARTIAL count(*))
         Workers Planned: 32
         Workers Launched: 32
         Buffers: shared hit=1473213
         ->  Partial Aggregate  (cost=1550049.96..1550049.97 rows=1 width=8) (actual time=31047.074..31047.075 rows=1 loops=33)
               Output: PARTIAL count(*)
               Buffers: shared hit=1470589
               Worker 0: actual time=31037.287..31037.288 rows=1 loops=1
                 Buffers: shared hit=43483
               Worker 1: actual time=31035.803..31035.804 rows=1 loops=1
                 Buffers: shared hit=45112
......
               Worker 31: actual time=31055.871..31055.876 rows=1 loops=1
                 Buffers: shared hit=46439
               ->  Parallel Seq Scan on public.t_bit2  (cost=0.00..1549983.80 rows=26465 width=0) (actual time=0.040..17244.827 rows=6060606 loops=33)
                     Output: id
                     Filter: (bitand(t_bit2.id, B'1010101010101010101010101010101010101010101010101010101010101010101010101010101010101010101010101010101010101010101010101010101010101010101010101010101010101010101010101010101010101010101
0101010101010'::"bit") = B'10101010101010101010101010101010101010101010101010101010101010101010101010101010101010101010101010101010101010101010101010101010101010101010101010101010101010101010101010101010101010101010101010101010'::"bit")
                     Buffers: shared hit=1470589
                     Worker 0: actual time=0.035..17314.296 rows=5913688 loops=1
                       Buffers: shared hit=43483
                     Worker 1: actual time=0.030..16965.158 rows=6135232 loops=1
                       Buffers: shared hit=45112
......
                     Worker 31: actual time=0.031..17580.908 rows=6315704 loops=1
                       Buffers: shared hit=46439
 Planning time: 0.354 ms
 Execution time: 31157.006 ms
(145 rows)

比特位运算  
postgres=# select count(*) from t_bit2 where bitand(id, '10101010101010101010101010101010101010101010101010101010101010101010101010101010101010101010101010101010101010101010101010101010101010101010101010101010101010101010101010101010101010101010101010101010')=B'10101010101010101010101010101010101010101010101010101010101010101010101010101010101010101010101010101010101010101010101010101010101010101010101010101010101010101010101010101010101010101010101010101010';
   count   
-----------
 200000000
(1 row)
Time: 4320.931 ms

COUNT  
postgres=# select count(*) from t_bit2;
   count   
-----------
 200000000
(1 row)
Time: 1896.647 ms

关闭并行的查询效率    
postgres=# set force_parallel_mode =off;
SET
postgres=# alter table t_bit2 set (parallel_degree =0);
ALTER TABLE
postgres=# \timing
Timing is on.
postgres=# select count(*) from t_bit2 where bitand(id, '10101010101010101010101010101010101010101010101010101010101010101010101010101010101010101010101010101010101010101010101010101010101010101010101010101010101010101010101010101010101010101010101010101010')=B'10101010101010101010101010101010101010101010101010101010101010101010101010101010101010101010101010101010101010101010101010101010101010101010101010101010101010101010101010101010101010101010101010101010';
   count   
-----------
 200000000
(1 row)
Time: 53098.480 ms
postgres=# select count(*) from t_bit2;
   count   
-----------
 200000000
(1 row)
Time: 18504.679 ms

表大小  
postgres=# \dt+ t_bit2
                    List of relations
 Schema |  Name  | Type  |  Owner   | Size  | Description 
--------+--------+-------+----------+-------+-------------
 public | t_bit2 | table | postgres | 11 GB | 
(1 row)


参考信息
http://www.postgresql.org/docs/9.6/static/sql-createtable.html

parallel_degree (integer)
The parallel degree for a table is the number of workers that should be used to assist a parallel scan of that table. If not set, the system will determine a value based on the relation size. The actual number of workers chosen by the planner may be less, for example due to the setting of max_parallel_degree.

http://www.postgresql.org/docs/9.6/static/runtime-config-query.html#RUNTIME-CONFIG-QUERY-OTHER

force_parallel_mode (enum)
Allows the use of parallel queries for testing purposes even in cases where no performance benefit is expected. The allowed values of force_parallel_mode are off (use parallel mode only when it is expected to improve performance), on (force parallel query for all queries for which it is thought to be safe), and regress (like on, but with additional behavior changes as explained below).

More specifically, setting this value to on will add a Gather node to the top of any query plan for which this appears to be safe, so that the query runs inside of a parallel worker. Even when a parallel worker is not available or cannot be used, operations such as starting a subtransaction that would be prohibited in a parallel query context will be prohibited unless the planner believes that this will cause the query to fail. If failures or unexpected results occur when this option is set, some functions used by the query may need to be marked PARALLEL UNSAFE (or, possibly, PARALLEL RESTRICTED).

Setting this value to regress has all of the same effects as setting it to on plus some additional effects that are intended to facilitate automated regression testing. Normally, messages from a parallel worker include a context line indicating that, but a setting of regress suppresses this line so that the output is the same as in non-parallel execution. Also, the Gather nodes added to plans by this setting are hidden in EXPLAIN output so that the output matches what would be obtained if this setting were turned off.

http://www.postgresql.org/docs/9.6/static/runtime-config-resource.html#RUNTIME-CONFIG-RESOURCE-ASYNC-BEHAVIOR

max_parallel_degree (integer)
Sets the maximum number of workers that can be started for an individual parallel operation. Parallel workers are taken from the pool of processes established by max_worker_processes. Note that the requested number of workers may not actually be available at runtime. If this occurs, the plan will run with fewer workers than expected, which may be inefficient. The default value is 2. Setting this value to 0 disables parallel query execution.

http://www.postgresql.org/docs/9.6/static/runtime-config-query.html#RUNTIME-CONFIG-QUERY-CONSTANTS

parallel_setup_cost (floating point)
Sets the planner's estimate of the cost of launching parallel worker processes. The default is 1000.
parallel_tuple_cost (floating point)
Sets the planner's estimate of the cost of transferring one tuple from a parallel worker process to another process. The default is 0.1.

PostgreSQL 9.6 攻克金融级多副本可靠性问题

$
0
0

PostgreSQL 9.6 在可靠性方面再出杀手锏。
通过流复制功能增强,提供多种可靠性模式可供用户根据需求进行选择,在可靠性和性能方面用户可以自由发挥。
最强模式满足金融级的可靠性要求。
如何做到的呢?
PG允许多个同步流复制standby节点,用户在事务提交时,需要等待多个同步的standby apply xlog,从而保证数据的多副本一致性。


具体的增强如下
.1. 事务提交保护级别增强如下
支持5个事务提交保护级别,确保事务提交时,XLOG的几种状态。
synchronous_commit =
on, remote_apply, remote_write, local, off
on 表示本地事务产生的xlog已flush到磁盘,同时sync standby(s)的xlog也已flush到磁盘。
remote_apply, 表示本地事务产生的xlog已flush到磁盘,同时sync standby(s)的xlog已回放。
remote_write, 表示本地事务产生的xlog已flush到磁盘,同时sync standby(s)的xlog 已write到OS dirty page。
local, 表示本地事务产生的xlog已flush到磁盘。
off, 表示


.2. 同步流复制保护级别增强
支持设置同步节点数,例如用户有4个standby,包含主节点共5个副本。
用户要求3副本一致,则num_sync设置为2即可,确保至少有2个standby与主节点一致。

synchronous_standby_names参数配置的两种写法:
num_sync为同步standby节点数, 以及standby name.
num_sync ( standby_name [, ...] )
未设置保护的standby节点数, 则默认为1个同步standby. 
standby_name [, ...]


http://www.postgresql.org/docs/9.6/static/runtime-config-replication.html#GUC-SYNCHRONOUS-STANDBY-NAMES

synchronous_standby_names (string)
Specifies a list of standby servers that can support synchronous replication, as described in Section 25.2.8. There will be one or more active synchronous standbys; transactions waiting for commit will be allowed to proceed after these standby servers confirm receipt of their data. The synchronous standbys will be those whose names appear earlier in this list, and that are both currently connected and streaming data in real-time (as shown by a state of streaming in the pg_stat_replication view). Other standby servers appearing later in this list represent potential synchronous standbys. If any of the current synchronous standbys disconnects for whatever reason, it will be replaced immediately with the next-highest-priority standby. Specifying more than one standby name can allow very high availability.

This parameter specifies a list of standby servers using either of the following syntaxes:

num_sync ( standby_name [, ...] )
standby_name [, ...]
where num_sync is the number of synchronous standbys that transactions need to wait for replies from, and standby_name is the name of a standby server. For example, a setting of 3 (s1, s2, s3, s4) makes transaction commits wait until their WAL records are received by three higher-priority standbys chosen from standby servers s1, s2, s3 and s4.

The second syntax was used before PostgreSQL version 9.6 and is still supported. It's the same as the first syntax with num_sync equal to 1. For example, 1 (s1, s2) and s1, s2 have the same meaning: either s1 or s2 is chosen as a synchronous standby.

The name of a standby server for this purpose is the application_name setting of the standby, as set in the primary_conninfo of the standby's WAL receiver. There is no mechanism to enforce uniqueness. In case of duplicates one of the matching standbys will be considered as higher priority, though exactly which one is indeterminate. The special entry * matches any application_name, including the default application name of walreceiver.

Note: Each standby_name should have the form of a valid SQL identifier, unless it is *. You can use double-quoting if necessary. But note that standby_names are compared to standby application names case-insensitively, whether double-quoted or not.
If no synchronous standby names are specified here, then synchronous replication is not enabled and transaction commits will not wait for replication. This is the default configuration. Even when synchronous replication is enabled, individual transactions can be configured not to wait for replication by setting the synchronous_commit parameter to local or off.

This parameter can only be set in the postgresql.conf file or on the server command line.


http://www.postgresql.org/docs/9.6/static/runtime-config-wal.html#GUC-WAL-LEVEL

synchronous_commit (enum)
Specifies whether transaction commit will wait for WAL records to be written to disk before the command returns a "success" indication to the client. Valid values are on, remote_apply, remote_write, local, and off. The default, and safe, setting is on. When off, there can be a delay between when success is reported to the client and when the transaction is really guaranteed to be safe against a server crash. (The maximum delay is three times wal_writer_delay.) Unlike fsync, setting this parameter to off does not create any risk of database inconsistency: an operating system or database crash might result in some recent allegedly-committed transactions being lost, but the database state will be just the same as if those transactions had been aborted cleanly. So, turning synchronous_commit off can be a useful alternative when performance is more important than exact certainty about the durability of a transaction. For more discussion see Section 29.3.

If synchronous_standby_names is non-empty, this parameter also controls whether or not transaction commits will wait for their WAL records to be replicated to the standby server(s). When set to on, commits will wait until replies from the current synchronous standby(s) indicate they have received the commit record of the transaction and flushed it to disk. This ensures the transaction will not be lost unless both the primary and all synchronous standbys suffer corruption of their database storage. When set to remote_apply, commits will wait until replies from the current synchronous standby(s) indicate they have received the commit record of the transaction and applied it, so that it has become visible to queries on the standby(s). When set to remote_write, commits will wait until replies from the current synchronous standby(s) indicate they have received the commit record of the transaction and written it out to their operating system. This setting is sufficient to ensure data preservation even if a standby instance of PostgreSQL were to crash, but not if the standby suffers an operating-system-level crash, since the data has not necessarily reached stable storage on the standby. Finally, the setting local causes commits to wait for local flush to disk, but not for replication. This is not usually desirable when synchronous replication is in use, but is provided for completeness.

If synchronous_standby_names is empty, the settings on, remote_apply, remote_write and local all provide the same synchronization level: transaction commits only wait for local flush to disk.

This parameter can be changed at any time; the behavior for any one transaction is determined by the setting in effect when it commits. It is therefore possible, and useful, to have some transactions commit synchronously and others asynchronously. For example, to make a single multistatement transaction commit asynchronously when the default is the opposite, issue SET LOCAL synchronous_commit TO OFF within the transaction.

PostgreSQL 基于行号(tid)的快速扫描

$
0
0

PostgreSQL 自带的表是堆表,数据按行存储在HEAP PAGE中,在btree索引中,除了存储字段的value,还会存储对应的ctid(即行号),检索记录也是通过行号进行检索的呢。


因此通过行号是可以快速检索到记录的。
行号的写法是(page_number, item_number),数据块从0开始编号,行号从1开始编号。


例子 :
查找0号数据块的第10条记录,走tid扫描,是非常快的,因为已经给出了page号和item号,直接定位block和item。

postgres=#  select * from t_bit2 where ctid='(0,10)'::tid;
                                     id                        
---------------------------------------------------------------------
 101010101010101010101010101010101010101010
(1 row)

postgres=# explain select * from t_bit2 where ctid='(0,10)'::tid;
                      QUERY PLAN                       
-------------------------------------------------------
 Tid Scan on t_bit2  (cost=0.00..1.01 rows=1 width=30)
   TID Cond: (ctid = '(0,10)'::tid)
(2 rows)


要使用tid进行快速的行扫描,必须开启参数enable_tidscan。否则就会走全表扫描的哦,那是非常慢的。

postgres=# set enable_tidscan=off;
SET
postgres=# explain select * from t_bit2 where ctid='(0,10)'::tid;
                         QUERY PLAN                          
-------------------------------------------------------------
 Seq Scan on t_bit2  (cost=0.00..3587783.60 rows=1 width=30)
   Filter: (ctid = '(0,10)'::tid)
(2 rows)

PostgreSQL 大表自动 freeze 优化思路

$
0
0

有没有被突发的IO惊到过,有没有见到过大量的autovacuum for prevent wrap。
本文依依解开这些头痛的问题。

PostgreSQL 的版本冻结是一个比较蛋疼的事情,为什么要做版本冻结呢?
因为PG的版本号是uint32的,是重复使用的,所以每隔大约20亿个事务后,必须要冻结,否则记录会变成未来的,对当前事务"不可见"。
冻结的事务号是2

src/include/access/transam.h
#define InvalidTransactionId            ((TransactionId) 0)
#define BootstrapTransactionId          ((TransactionId) 1)
#define FrozenTransactionId                     ((TransactionId) 2)
#define FirstNormalTransactionId        ((TransactionId) 3)
#define MaxTransactionId                        ((TransactionId) 0xFFFFFFFF)


现在,还可以通过行的t_infomask来区分行是否为冻结行

src/include/access/htup_details.h
/*
 * information stored in t_infomask:
 */
#define HEAP_XMIN_COMMITTED             0x0100  /* t_xmin committed */
#define HEAP_XMIN_INVALID               0x0200  /* t_xmin invalid/aborted */
#define HEAP_XMIN_FROZEN                (HEAP_XMIN_COMMITTED|HEAP_XMIN_INVALID)


表的最老事务号则是记录在pg_class.relfrozenxid里面的。
执行vacuum freeze table,除了修改t_infomask,还需要修改该表对应的pg_class.relfrozenxid的值。


那么系统什么时候会触发对表进行冻结呢?
当表的年龄大于autovacuum_freeze_max_age时(默认是2亿),autovacuum进程会自动对表进行freeze。
freeze后,还可以清除掉比整个集群的最老事务号早的clog文件。
那么可能会出现这样的情形:
可能有很多大表的年龄会先后到达2亿,数据库的autovacuum会开始对这些表依次进行vacuum freeze,从而集中式的爆发大量的读IO(DATAFILE)和写IO(DATAFILE以及XLOG)。
如果又碰上业务高峰,会出现很不好的影响。


为什么集中爆发很常见?
因为默认情况下,所有表的autovacuum_freeze_max_age是一样的,并且大多数的业务,一个事务或者相邻的事务都会涉及多个表的操作,所以这些大表的最老的事务号可能都是相差不大的。
这样,就有非常大的概率导致很多表的年龄是相仿的,从而导致集中的爆发多表的autovacuum freeze。


PostgreSQL有什么机制能尽量的减少多个表的年龄相仿吗?
目前来看,有一个机制,也许能降低年龄相仿性,但是要求表有发生UPDATE,对于只有INSERT的表无效。
vacuum_freeze_min_age 这个参数,当发生vacuum或者autovacuum时,扫过的记录,只要年龄大于它,就会置为freeze。因此有一定的概率可以促使频繁更新的表年龄不一致。


那么还有什么手段能放在或者尽量避免大表的年龄相仿呢?
为每个表设置不同的autovacuum_freeze_max_age值,从认为的错开来进行vacuum freeze的时机。
例如有10个大表,把全局的autovacuum_freeze_max_age设置为5亿,然后针对这些表,从2亿开始每个表间隔1000万事务设置autovacuum_freeze_max_age。 如2亿,2.1亿,2.2亿,2.3亿,2.4亿....2.9亿。
除非这些表同时达到 2亿,2.1亿,2.2亿,2.3亿,2.4亿....2.9亿。 否则不会出现同时需要vacuum freeze的情况。


但是,如果有很多大表,这样做可能就不太合适了。
建议还是人为的在业务空闲时间,对大表进行vacuum freeze。

建议
1. 分区,把大表分成小表。每个表的数据量取决于系统的IO能力,前面说了VACUUM FREEZE是扫全表的, 现代的硬件每个表建议不超过32GB。
2. 对大表设置不同的vacuum年龄.
alter table t set (autovacuum_freeze_max_age=xxxx);
3. 用户自己调度 freeze,如在业务低谷的时间窗口,对年龄较大,数据量较大的表进行vacuum freeze。
4. 年龄只能降到系统存在的最早的长事务即 min pg_stat_activity.(backend_xid, backend_xmin)。 因此也需要密切关注长事务。

PostgreSQL 9.6 黑科技 bloom 算法索引,一个索引支撑任意列组合查询

$
0
0

PostgreSQL 确实是学术界和工业界的璀璨明珠,它总是喜欢将学术界的一些玩意工业化,这次的bloom又是一个代表。
在PG很多的地方都能看到学术的影子,比如pgbench支持产生泊松分布,高斯分布的随机值。
bloom filter是一个有损过滤器,使用有限的比特位存储一些唯一值集合所产生的bits。
通过这些bits可以满足这样的场景需求,给定一个值,判断这个值是否属于这个集合。
例如

create table test(c1 int);
insert into test select trunc(random()*100000) from generate_series(1,10000);

使用所有的 test.c1 值,通过bloom filter算法生成一个值val。
然后给定一个值例如 100,判断100是否在test.c1中。

select * from test where c1=100; 

通过bloom filter可以快速得到,不需要遍历表来得到。
判断方法是使用100和val以及统一的bloom算法。
可能得到的结果是true or false。
true表示100在这里面,false表示100不在这里面。
必须注意,由于bloom filter是有损过滤器,并且真的不一定为真,但是假的一定为假。


PostgreSQL 9.6使用custom access methods接口定义了一个索引接口bloom,使用到它的特性:
真的不一定为真,但是假的一定为假。
目前已实现的场景是,支持=查询,但是这个=会包含一些假的值,所以需要recheck。
反过来,它如果要支持<>也是很方便的,并且不需要recheck。


使用PostgreSQL 函数接口也能实现bloom过滤器。
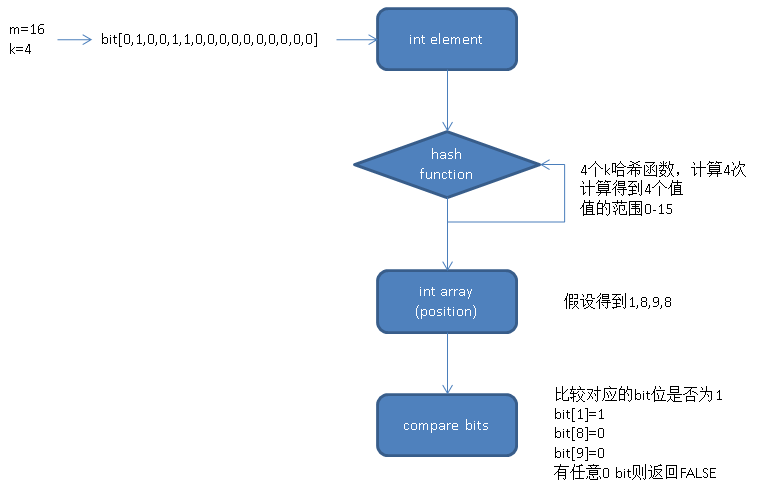
bloom需要m个bit位。
添加元素时,需要k个hash函数,通过每一个hash和传入的值计算得到另一个值([0,m])。
得到的值用于设置对应的bit位为1。
例子

创建一个类型,存储bloom。

CREATE TYPE dumbloom AS (
  m    integer,  -- bit 位数
  k    integer,  --  hash 函数数量
  -- Our bit array is actually an array of integers
  bits integer[]    --  bit
);


创建一个空的bloom ,设置false值异常设置为TRUE的概率p, 设置期望存储多少个唯一值n 。

CREATE FUNCTION dumbloom_empty (
  -- 2% false probability
  p float8 DEFAULT 0.02,
  -- 100k expected uniques
  n integer DEFAULT 100000
) RETURNS dumbloom AS
$$
DECLARE
  m    integer;
  k    integer;
  i    integer;
  bits integer[];   
BEGIN
  -- Getting m and k from n and p is some math sorcery
  -- See: https://en.wikipedia.org/wiki/Bloom_filter#Optimal_number_of_hash_functions
  m := abs(ceil(n * ln(p) / (ln(2) ^ 2)))::integer;
  k := round(ln(2) * m / n)::integer;
  bits := NULL;

  -- Initialize all bits to 0
  FOR i in 1 .. ceil(m / 32.0) LOOP
    bits := array_append(bits, 0);
  END LOOP;

  RETURN (m, k, bits)::dumbloom;
END;
$$
LANGUAGE 'plpgsql' IMMUTABLE;


创建一个指纹函数,存储使用K个哈希函数得到的值,存入数组。
1

CREATE FUNCTION dumbloom_fingerprint (
  b    dumbloom,
  item text
) RETURNS integer[] AS 
$$
DECLARE
  h1     bigint;
  h2     bigint;
  i      integer;
  fingerprint integer[];
BEGIN
  h1 := abs(hashtext(upper(item)));
  -- If lower(item) and upper(item) are the same, h1 and h2 will be identical too,
  -- let's add some random salt
  h2 := abs(hashtext(lower(item) || 'yo dawg!'));
  finger := NULL; 

  FOR i IN 1 .. b.k LOOP
    -- This combinatorial approach works just as well as using k independent
    -- hash functions, but is obviously much faster
    -- See: http://www.eecs.harvard.edu/~kirsch/pubs/bbbf/esa06.pdf
    fingerprint := array_append(fingerprint, ((h1 + i * h2) % b.m)::integer);
  END LOOP;

  RETURN fingerprint;
END;
$$
LANGUAGE 'plpgsql' IMMUTABLE;


添加元素的函数
同样也是设置对应的bit为1

CREATE FUNCTION dumbloom_add (
  b    dumbloom,
  item text,
) RETURNS dumbloom AS 
$$
DECLARE
  i    integer;
  idx  integer;
BEGIN
  IF b IS NULL THEN
    b := dumbloom_empty();  -- 生成空bloom
  END IF;

  FOREACH i IN ARRAY dumbloom_fingerprint(b, item) LOOP  -- 设置k个哈希产生的值对应的bit位为1
    -- Postgres uses 1-indexing, hence the + 1 here
    idx := i / 32 + 1;
    b.bits[idx] := b.bits[idx] | (1 << (i % 32));
  END LOOP;

  RETURN b;
END;
$$
LANGUAGE 'plpgsql' IMMUTABLE;


是否包含某元素
2

CREATE FUNCTION dumbloom_contains (
  b    dumbloom,
  item text
) RETURNS boolean AS 
$$
DECLARE
  i   integer;
  idx integer;
BEGIN
  IF b IS NULL THEN
    RETURN FALSE;
  END IF;

  FOREACH i IN ARRAY dumbloom_fingerprint(b, item) LOOP  -- 计算k个哈希产生的值,判断是否有非1的bit, 有则返回false,如果全部为1则返回true. 
    idx := i / 32 + 1;
    IF NOT (b.bits[idx] & (1 << (i % 32)))::boolean THEN
      RETURN FALSE;
    END IF;
  END LOOP;

  RETURN TRUE;
END;
$$
LANGUAGE 'plpgsql' IMMUTABLE;


测试

CREATE TABLE t (
  users dumbloom
);

INSERT INTO t VALUES (dumbloom_empty());

UPDATE t SET users = dumbloom_add(users, 'usmanm');
UPDATE t SET users = dumbloom_add(users, 'billyg');
UPDATE t SET users = dumbloom_add(users, 'pipeline');

-- This first three will return true
SELECT dumbloom_contains(users, 'usmanm') FROM t;
SELECT dumbloom_contains(users, 'billyg') FROM t;
SELECT dumbloom_contains(users, 'pipeline') FROM t;
-- This will return false because we never added 'unknown' to the Bloom filter
SELECT dumbloom_contains(users, 'unknown') FROM t;

以上例子来自pipelinedb文档, 用C语言写成聚合函数,可以实现流式计算。
https://www.pipelinedb.com/blog/making-postgres-bloom


接下来是PostgreSQL 9.6的例子,9.6是将它做成了索引,而不是聚合。
(如果有朋友想使用pipelinedb的bloom聚合,可以看看PIPELINEDB的代码,PORT过来)

postgres=# create table test(id int);
CREATE TABLE
postgres=# insert into test select trunc(100000000*(random())) from generate_series(1,100000000);
INSERT 0 100000000
postgres=# create index idx_test_id on test using bloom(id);
CREATE INDEX
postgres=# select * from test limit 10;
    id    
----------
 16567697
 17257165
 78384532
 96331329
 62449166
  3965065
 80439767
 54772860
 34960167
 30594730
(10 rows)

位图扫  
postgres=# explain (analyze,verbose,timing,costs,buffers) select * from test where id=16567697;
                                                           QUERY PLAN                                                            
---------------------------------------------------------------------------------------------------------------------------------
 Bitmap Heap Scan on public.test  (cost=946080.00..946082.03 rows=2 width=4) (actual time=524.545..561.168 rows=3 loops=1)
   Output: id
   Recheck Cond: (test.id = 16567697)
   Rows Removed by Index Recheck: 30870
   Heap Blocks: exact=29846
   Buffers: shared hit=225925
   ->  Bitmap Index Scan on idx_test_id  (cost=0.00..946080.00 rows=2 width=0) (actual time=517.448..517.448 rows=30873 loops=1)
         Index Cond: (test.id = 16567697)
         Buffers: shared hit=196079
 Planning time: 0.084 ms
 Execution time: 561.535 ms
(11 rows)

全表扫  
postgres=# explain (analyze,verbose,timing,costs,buffers) select * from test where id=16567697;
                                                  QUERY PLAN                                                  
--------------------------------------------------------------------------------------------------------------
 Seq Scan on public.test  (cost=0.00..1692478.00 rows=2 width=4) (actual time=0.017..8270.536 rows=3 loops=1)
   Output: id
   Filter: (test.id = 16567697)
   Rows Removed by Filter: 99999997
   Buffers: shared hit=442478
 Planning time: 0.077 ms
 Execution time: 8270.564 ms
(7 rows)

多个字段测试,16个字段,任意测试组合,速度和recheck有关, recheck越少越好。
不仅仅支持and还支持or, 只是OR的条件是bitmap的, 会慢一些。

postgres=# create table test1(c1 int, c2 int, c3 int, c4 int, c5 int, c6 int ,c7 int, c8 int, c9 int, c10 int, c11 int, c12 int, c13 int, c14 int, c15 int, c16 int);
CREATE TABLE
postgres=# insert into test1 select i,i+1,i-1,i+2,i-2,i+3,i-3,i+4,i-4,i+5,i-5,i+6,i-6,i+7,i-7,i+8 from (select trunc(100000000*(random())) i from generate_series(1,10000000)) t;
INSERT 0 10000000
postgres=# create index idx_test1_1 on test1 using bloom (c1,c2,c3,c4,c5,c6,c7,c8,c9,c10,c11,c12,c13,c14,c15);
CREATE INDEX
postgres=# \dt+ test1
                    List of relations
 Schema | Name  | Type  |  Owner   |  Size  | Description 
--------+-------+-------+----------+--------+-------------
 public | test1 | table | postgres | 888 MB | 
(1 row)

postgres=# \di+ idx_test1_1
                           List of relations
 Schema |    Name     | Type  |  Owner   | Table |  Size  | Description 
--------+-------------+-------+----------+-------+--------+-------------
 public | idx_test1_1 | index | postgres | test1 | 153 MB | 
(1 row)

postgres=# select * from test1 limit 10;
    c1    |    c2    |    c3    |    c4    |    c5    |    c6    |    c7    |    c8    |    c9    |   c10    |   c11    |   c12    |   c13    |   c14    |   c15    |   c16    
----------+----------+----------+----------+----------+----------+----------+----------+----------+----------+----------+----------+----------+----------+----------+----------
 68747916 | 68747917 | 68747915 | 68747918 | 68747914 | 68747919 | 68747913 | 68747920 | 68747912 | 68747921 | 68747911 | 68747922 | 68747910 | 68747923 | 68747909 | 68747924
 36630121 | 36630122 | 36630120 | 36630123 | 36630119 | 36630124 | 36630118 | 36630125 | 36630117 | 36630126 | 36630116 | 36630127 | 36630115 | 36630128 | 36630114 | 36630129
 72139701 | 72139702 | 72139700 | 72139703 | 72139699 | 72139704 | 72139698 | 72139705 | 72139697 | 72139706 | 72139696 | 72139707 | 72139695 | 72139708 | 72139694 | 72139709
 35950519 | 35950520 | 35950518 | 35950521 | 35950517 | 35950522 | 35950516 | 35950523 | 35950515 | 35950524 | 35950514 | 35950525 | 35950513 | 35950526 | 35950512 | 35950527
 15285103 | 15285104 | 15285102 | 15285105 | 15285101 | 15285106 | 15285100 | 15285107 | 15285099 | 15285108 | 15285098 | 15285109 | 15285097 | 15285110 | 15285096 | 15285111
 43537916 | 43537917 | 43537915 | 43537918 | 43537914 | 43537919 | 43537913 | 43537920 | 43537912 | 43537921 | 43537911 | 43537922 | 43537910 | 43537923 | 43537909 | 43537924
 38702018 | 38702019 | 38702017 | 38702020 | 38702016 | 38702021 | 38702015 | 38702022 | 38702014 | 38702023 | 38702013 | 38702024 | 38702012 | 38702025 | 38702011 | 38702026
 59069936 | 59069937 | 59069935 | 59069938 | 59069934 | 59069939 | 59069933 | 59069940 | 59069932 | 59069941 | 59069931 | 59069942 | 59069930 | 59069943 | 59069929 | 59069944
  6608034 |  6608035 |  6608033 |  6608036 |  6608032 |  6608037 |  6608031 |  6608038 |  6608030 |  6608039 |  6608029 |  6608040 |  6608028 |  6608041 |  6608027 |  6608042
 35486917 | 35486918 | 35486916 | 35486919 | 35486915 | 35486920 | 35486914 | 35486921 | 35486913 | 35486922 | 35486912 | 35486923 | 35486911 | 35486924 | 35486910 | 35486925
(10 rows)


任意字段组合查询都能用上这个索引

postgres=# explain (analyze,verbose,timing,costs,buffers) select * from test1 where c8=68747920 and c10=68747921 and c16=68747924 and c7=68747913 and c5=68747914;
                                                          QUERY PLAN                                                           
-------------------------------------------------------------------------------------------------------------------------------
 Bitmap Heap Scan on public.test1  (cost=169609.00..169610.02 rows=1 width=64) (actual time=101.724..102.317 rows=1 loops=1)
   Output: c1, c2, c3, c4, c5, c6, c7, c8, c9, c10, c11, c12, c13, c14, c15, c16
   Recheck Cond: ((test1.c5 = 68747914) AND (test1.c7 = 68747913) AND (test1.c8 = 68747920) AND (test1.c10 = 68747921))
   Rows Removed by Index Recheck: 425
   Filter: (test1.c16 = 68747924)
   Heap Blocks: exact=425
   Buffers: shared hit=20033
   ->  Bitmap Index Scan on idx_test1_1  (cost=0.00..169609.00 rows=1 width=0) (actual time=101.636..101.636 rows=426 loops=1)
         Index Cond: ((test1.c5 = 68747914) AND (test1.c7 = 68747913) AND (test1.c8 = 68747920) AND (test1.c10 = 68747921))
         Buffers: shared hit=19608
 Planning time: 0.129 ms
 Execution time: 102.364 ms
(12 rows)

postgres=# explain (analyze,verbose,timing,costs,buffers) select * from test1 where c8=68747920 and c10=68747921 and c16=68747924 and c7=68747913 and c5=68747914 and c12=68747922;
                                                                      QUERY PLAN                                                                       
-------------------------------------------------------------------------------------------------------------------------------------------------------
 Bitmap Heap Scan on public.test1  (cost=194609.00..194610.03 rows=1 width=64) (actual time=54.702..54.746 rows=1 loops=1)
   Output: c1, c2, c3, c4, c5, c6, c7, c8, c9, c10, c11, c12, c13, c14, c15, c16
   Recheck Cond: ((test1.c5 = 68747914) AND (test1.c7 = 68747913) AND (test1.c8 = 68747920) AND (test1.c10 = 68747921) AND (test1.c12 = 68747922))
   Rows Removed by Index Recheck: 27
   Filter: (test1.c16 = 68747924)
   Heap Blocks: exact=28
   Buffers: shared hit=19636
   ->  Bitmap Index Scan on idx_test1_1  (cost=0.00..194609.00 rows=1 width=0) (actual time=54.667..54.667 rows=28 loops=1)
         Index Cond: ((test1.c5 = 68747914) AND (test1.c7 = 68747913) AND (test1.c8 = 68747920) AND (test1.c10 = 68747921) AND (test1.c12 = 68747922))
         Buffers: shared hit=19608
 Planning time: 0.141 ms
 Execution time: 54.814 ms
(12 rows)

如果使用其他的索引方法,任意条件组合查询,需要为每一种组合创建一个索引来支持。
而使用bloom索引方法,只需要创建一个索引就够了。
http://www.postgresql.org/docs/9.6/static/bloom.html

通过ODBC连接PostgreSQL和Greenplum

$
0
0

安装驱动

yum install -y unixODBC.x86_64  
yum install -y postgresql-odbc.x86_64  

查看驱动配置

cat /etc/odbcinst.ini 
# Example driver definitions

# Driver from the postgresql-odbc package
# Setup from the unixODBC package
[PostgreSQL]
Description     = ODBC for PostgreSQL
Driver          = /usr/lib/psqlodbcw.so
Setup           = /usr/lib/libodbcpsqlS.so
Driver64        = /usr/lib64/psqlodbcw.so
Setup64         = /usr/lib64/libodbcpsqlS.so
FileUsage       = 1


# Driver from the mysql-connector-odbc package
# Setup from the unixODBC package
[MySQL]
Description     = ODBC for MySQL
Driver          = /usr/lib/libmyodbc5.so
Setup           = /usr/lib/libodbcmyS.so
Driver64        = /usr/lib64/libmyodbc5.so
Setup64         = /usr/lib64/libodbcmyS.so
FileUsage       = 1

配置DSN

/etc/odbc.ini 
[digoal]
Description = Test to Postgres
Driver = PostgreSQL
Database = postgres
Servername = xxxx.pg.rds.aliyuncs.com
UserName = xxxx
Password = xxxx
Port = 3433
ReadOnly = 0

[gp]
Description = Test to gp
Driver = PostgreSQL
Database = mygpdb
Servername = xxxx.gpdb.rds.aliyuncs.com
UserName = xxxx
Password = xxxx
Port = 3568
ReadOnly = 0

测试连通性

echo "select count(*) from pg_class"|isql gp
+---------------------------------------+
| Connected!                            |
|                                       |
| sql-statement                         |
| help [tablename]                      |
| quit                                  |
|                                       |
+---------------------------------------+
SQL> select count(*) from pg_class
+---------------------+
| count               |
+---------------------+
| 388                 |
+---------------------+
SQLRowCount returns 1
1 rows fetched

echo "select count(*) from pg_class"|isql digoal
+---------------------------------------+
| Connected!                            |
|                                       |
| sql-statement                         |
| help [tablename]                      |
| quit                                  |
|                                       |
+---------------------------------------+
SQL> select count(*) from pg_class
+---------------------+
| count               |
+---------------------+
| 1330                |
+---------------------+
SQLRowCount returns 1
1 rows fetched

参考文档
http://blog.163.com/digoal@126/blog/static/16387704020119934923142

https://odbc.postgresql.org/docs/config.html

https://odbc.postgresql.org/docs/config-opt.html

PostgreSQL 如何实现upsert与新旧数据自动分离

$
0
0

很多业务也行有这样的需求,新的数据会不断的插入,并且可能会有更新。
对于更新的数据,需要记录更新前的记录到历史表。
1
这个需求有点类似于审计需求,即需要对记录变更前后做审计。
我以前有写过使用hstore和触发器来满足审计需求的文档,有兴趣的同学可以参考
http://blog.163.com/digoal@126/blog/static/163877040201252575529358/
本文的目的并不是审计,而且也可能不期望使用触发器。
还有什么方法呢?
PostgreSQL 这么高大上,当然有,而且还能在一句SQL里面完成,看法宝。


创建一张当前状态表,一张历史记录表。

postgres=# create table tbl(id int primary key, price int);
CREATE TABLE
postgres=# create table tbl_history (id int not null, price int);
CREATE TABLE


插入一条不存在的记录,不会触发插入历史表的行为。
注意替代变量

id=$1 = 2
price=$2 = 7

postgres=# with old as (select * from tbl where id= $1), 
postgres-# new as (insert into tbl values ($1, $2) on conflict (id) do update set price=excluded.price where tbl.price<>excluded.price returning *) 
postgres-# insert into tbl_history select old.* from old,new where old.id=new.id;
INSERT 0 0

postgres=# select tableoid,ctid,* from tbl union all select tableoid,ctid,* from tbl_history ;
 tableoid | ctid  | id | price 
----------+-------+----+-------
    18243 | (0,1) |  2 |     7
(1 row)


插入一条不存在的记录,不会触发插入历史表的行为。

id=$1 = 1
price=$2 = 1

postgres=# with old as (select * from tbl where id= $1), 
new as (insert into tbl values ($1, $2) on conflict (id) do update set price=excluded.price where tbl.price<>excluded.price returning *) 
insert into tbl_history select old.* from old,new where old.id=new.id;
INSERT 0 0
postgres=# select tableoid,ctid,* from tbl union all select tableoid,ctid,* from tbl_history ;
 tableoid | ctid  | id | price 
----------+-------+----+-------
    18243 | (0,1) |  2 |     7
    18243 | (0,2) |  1 |     1
(2 rows)


插入一条已存在的记录,并且有数据的变更,触发数据插入历史表的行为。

id=$1 = 1
price=$2 = 2

postgres=# with old as (select * from tbl where id= $1), 
new as (insert into tbl values ($1, $2) on conflict (id) do update set price=excluded.price where tbl.price<>excluded.price returning *) 
insert into tbl_history select old.* from old,new where old.id=new.id;
INSERT 0 1
postgres=# select tableoid,ctid,* from tbl union all select tableoid,ctid,* from tbl_history ;
 tableoid | ctid  | id | price 
----------+-------+----+-------
    18243 | (0,1) |  2 |     7
    18243 | (0,3) |  1 |     2
    18251 | (0,1) |  1 |     1
(3 rows)


插入一条已存在的记录,并且已存在的记录值和老值一样,不会触发将数据插入历史表的行为。

id=$1 = 1
price=$2 = 2

postgres=# with old as (select * from tbl where id= $1), 
new as (insert into tbl values ($1, $2) on conflict (id) do update set price=excluded.price where tbl.price<>excluded.price returning *) 
insert into tbl_history select old.* from old,new where old.id=new.id;
INSERT 0 0
postgres=# select tableoid,ctid,* from tbl union all select tableoid,ctid,* from tbl_history ;
 tableoid | ctid  | id | price 
----------+-------+----+-------
    18243 | (0,1) |  2 |     7
    18243 | (0,3) |  1 |     2
    18251 | (0,1) |  1 |     1
(3 rows)


执行计划

postgres=# explain with old as (select * from tbl where id= $1), 
new as (insert into tbl values ($1, $2) on conflict (id) do update set price=excluded.price where tbl.price<>excluded.price returning *) 
insert into tbl_history select old.* from old,new where old.id=new.id;
                                 QUERY PLAN                                 
----------------------------------------------------------------------------
 Insert on tbl_history  (cost=2.17..2.23 rows=1 width=8)
   CTE old
     ->  Index Scan using tbl_pkey on tbl  (cost=0.14..2.16 rows=1 width=8)
           Index Cond: (id = 1)
   CTE new
     ->  Insert on tbl tbl_1  (cost=0.00..0.01 rows=1 width=8)
           Conflict Resolution: UPDATE
           Conflict Arbiter Indexes: tbl_pkey
           Conflict Filter: (tbl_1.price <> excluded.price)
           ->  Result  (cost=0.00..0.01 rows=1 width=8)
   ->  Nested Loop  (cost=0.00..0.05 rows=1 width=8)
         Join Filter: (old.id = new.id)
         ->  CTE Scan on old  (cost=0.00..0.02 rows=1 width=8)
         ->  CTE Scan on new  (cost=0.00..0.02 rows=1 width=4)
(14 rows)


在不支持insert on conflict语法的PostgreSQL中(小于9.5的版本),SQL可以调整为:

id=$1 = 1
price=$2 = 2

with new as (update tbl set price=$2 where id=$1 and price<>$2) 
  insert into tbl select $1, $2 where not exists (select 1 from tbl where id=$1);

更多upset参考
https://yq.aliyun.com/articles/36103


小于9.5的版本,实现本文的场景,需要这样写。

id=$1 = 1
price=$2 = 2

with 
old as (select * from tbl where id=$1),
new_upd as (update tbl set price=$2 where id=$1 and price<>$2 returning *),
new_ins as (insert into tbl select $1, $2 where not exists (select 1 from tbl where id=$1) returning *)
insert into tbl_history 
select old.* from old left outer join new_upd on (old.id=new_upd.id) where new_upd.* is not null;

使用Londiste3 增量同步 线下PostgreSQL 到 阿里云RDS PG

$
0
0

源端

CentOS 7
PostgreSQL 9.5.2 , listen port 1922
公网IP 101.xxx.xxx.171
skytools 3.2.6

目标端

RDS PG
xxx.digoal.pg.rds.aliyuncs.com port=3433 user=digoal dbname=db1 password=digoal


源端
安装 PostgreSQL 略


源库

postgres=# create database db1;
CREATE DATABASE

目标库

RDS PG
postgres=# create database db1;
CREATE DATABASE


安装 londiste3

# yum install -y python python-dev rsync autoconf automake asciidoc xmlto libtool

$ git clone git://git.postgresql.org/git/skytools.git

$ cd skytools

$ git submodule init
$ git submodule update

$ ./autogen.sh
$ ./configure --prefix=/home/digoal/skytools3.2
$ make -j 32
$ make install

$ su - root
# cd /home/digoal/skytools
# python setup_pkgloader.py build
# python setup_pkgloader.py install
# python setup_skytools.py build
# python setup_skytools.py install

# export PATH=/home/digoal/pgsql9.5/bin:$PATH
# easy_install pip
# pip install psycopg2


配置 londiste3

mkdir -p /home/digoal/londiste3/log
mkdir -p /home/digoal/londiste3/pid

$ export PATH=/home/digoal/pgsql9.5/bin:/home/digoal/skytoos3.2/bin:$PATH

生成配置文件模板的方法

$ londiste3 --ini

根节点配置文件
必须使用超级用户连接数据库

$ vi /home/digoal/londiste3/job1.ini
[londiste3]
job_name = job1
db = host=127.0.0.1 port=1922 user=postgres dbname=db1 password=postgres
queue_name = replika
logfile = /home/digoal/londiste3/log/job1.log
pidfile = /home/digoal/londiste3/pid/job1.pid
parallel_copies = 16
node_name = local
public_node_location = host=101.xxx.xxx.171 port=1922 user=postgres dbname=db1 password=postgres

创建根节点

$ londiste3 -v /home/digoal/londiste3/job1.ini create-root job1

启动worker

$ londiste3 -d /home/digoal/londiste3/job1.ini worker

配置目标端
因为RDS PG只有普通用户,而且是叶子节点,不需要创建pgq

# vi /usr/share/skytools3/pgq.sql
注释所有 CREATE OR REPLACE FUNCTION

目标节点配置文件

$ vi /home/digoal/londiste3/job2.ini
[londiste3]
job_name = job2
db = host=xxx.digoal.pg.rds.aliyuncs.com port=3433 user=digoal dbname=db1 password=digoal
queue_name = replika
logfile = /home/digoal/londiste3/log/job2.log
pidfile = /home/digoal/londiste3/pid/job2.pid
parallel_copies = 16
node_name = target
public_node_location = host=xxx.digoal.pg.rds.aliyuncs.com port=3433 user=digoal dbname=db1 password=digoal
initial_provider_location = host=127.0.0.1 port=1922 user=postgres dbname=db1 password=postgres

创建叶子节点

$ londiste3 -v /home/digoal/londiste3/job2.ini create-leaf job2

启动worker

$ londiste3 -d /home/digoal/londiste3/job2.ini worker

RDS还没有向用户开放如下权限,所以使用londiste3会报错(截至2016-05-25还未修正该权限)

session_replication_role 权限


创建队列分片配置文件

$ vi /home/digoal/londiste3/pgqd.ini
[pgqd]
base_connstr = host=127.0.0.1 port=1922 user=postgres dbname=db1 password=postgres
initial_database = template1
logfile = /home/digoal/londiste3/log/pgqd.log
pidfile = /home/digoal/londiste3/pid/pgqd.pid

启动队列分片

$ pgqd -d /home/digoal/londiste3/pgqd.ini

查看状态

digoal@iZ25zysa2jmZ-> londiste3 /home/digoal/londiste3/job1.ini status
Queue: replika   Local node: job1

job1 (root)
  |                           Tables: 0/0/0
  |                           Lag: 6s, Tick: 6
  +--: job2 (leaf)
                              Tables: 0/0/0
                              Lag: 6s, Tick: 6
digoal@iZ25zysa2jmZ-> londiste3 /home/digoal/londiste3/job2.ini status
Queue: replika   Local node: job2

job1 (root)
  |                           Tables: 0/0/0
  |                           Lag: 10s, Tick: 6
  +--: job2 (leaf)
                              Tables: 0/0/0
                              Lag: 10s, Tick: 6


查看members

digoal@iZ25zysa2jmZ-> londiste3 /home/digoal/londiste3/job2.ini members
Member info on job2@replika:
node_name        dead             node_location
---------------  ---------------  -----------------------------------------------------------------------------------------------
job1             False            host=101.xxx.xxx.171 port=1922 user=postgres dbname=db1 password=postgres
job2             False            host=xxx.digoal.pg.rds.aliyuncs.com port=3433 user=digoal dbname=db1 password=digoal


源端
初始化需要同步的表

pgbench -i db1
NOTICE:  table "pgbench_history" does not exist, skipping
NOTICE:  table "pgbench_tellers" does not exist, skipping
NOTICE:  table "pgbench_accounts" does not exist, skipping
NOTICE:  table "pgbench_branches" does not exist, skipping
creating tables...
100000 of 100000 tuples (100%) done (elapsed 0.03 s, remaining 0.00 s)
vacuum...
set primary keys...
done.

目标库只需要建立表结构

pgbench -i -h xxx.digoal.pg.rds.aliyuncs.com -p 3433 -U digoal db1
db1=> truncate pgbench_accounts ;
TRUNCATE TABLE
db1=> truncate pgbench_history ;
TRUNCATE TABLE
db1=> truncate pgbench_tellers ;
TRUNCATE TABLE
db1=> truncate pgbench_branches ;
TRUNCATE TABLE

添加需要同步的表(必须包含主键)

$ londiste3 -v /home/digoal/londiste3/job1.ini add-table public.pgbench_tellers public.pgbench_accounts public.pgbench_branches
$ londiste3 -v /home/digoal/londiste3/job2.ini add-table public.pgbench_tellers public.pgbench_accounts public.pgbench_branches

查看状态

digoal@iZ25zysa2jmZ-> londiste3 /home/digoal/londiste3/job1.ini tables
Tables on node
table_name               merge_state      table_attrs
-----------------------  ---------------  ---------------
public.pgbench_accounts  ok               
public.pgbench_branches  ok               
public.pgbench_tellers   ok               

digoal@iZ25zysa2jmZ-> londiste3 /home/digoal/londiste3/job2.ini tables
Tables on node
table_name               merge_state      table_attrs
-----------------------  ---------------  ---------------
public.pgbench_accounts  in-copy          
public.pgbench_branches  in-copy          
public.pgbench_tellers   in-copy          

复制好之后是这个状态

digoal@iZ25zysa2jmZ-> londiste3 /home/digoal/londiste3/job2.ini tables
Tables on node
table_name               merge_state      table_attrs
-----------------------  ---------------  ---------------
public.pgbench_accounts  ok               
public.pgbench_branches  ok               
public.pgbench_tellers   ok               

执行压测

pgbench -M prepared -n -r -P 1 -c 8 -j 8 -T 10 db1

比较数据是否一致

$ londiste3 /home/digoal/londiste3/job2.ini compare

PostgreSQL 9.6 sharding 技术改进 支持FDW数据节点下推 排序、JOIN 了

$
0
0

PostgreSQL 持续在基于fdw的sharding技术上深耕,9.6开始,在符合条件的前提下,支持JOIN和SORT下推到数据节点执行。
下面是一个测试
创建几个shard库

for subfix in 0 1 2 3 
do
psql -c "create database db$subfix"
done

创建master库

psql -c "create database master;"
psql master -c "create extension postgres_fdw;"

在master库创建foreign server和user mapping

for subfix in 0 1 2 3 
do
psql master -c "create server db$subfix foreign data wrapper postgres_fdw options (hostaddr 'xxx.xxx.xxx.xxx', dbname 'db$subfix', port '1923');"
psql master -c "create user mapping for postgres server db$subfix options (user 'postgres', password 'postgres');"
done

在shard库创建分片表

for subfix in 0 1 2 3 
do
psql db$subfix -c "drop table if exists tbl; create table tbl(id int primary key, info text)"
psql db$subfix -c "drop table if exists tab; create table tab(id int primary key, info text)"
done

在master库创建foreign 表,并设置约束

for subfix in 0 1 2 3 
do
psql master -c "drop foreign table if exists tbl$subfix ; create foreign table tbl$subfix (id int not null, info text) server db$subfix options (schema_name 'public', table_name 'tbl');"
psql master -c "alter foreign table tbl$subfix add constraint ck1 check (mod(id,4) = $subfix );"

psql master -c "drop foreign table if exists tab$subfix ; create foreign table tab$subfix (id int not null, info text) server db$subfix options (schema_name 'public', table_name 'tab');"
psql master -c "alter foreign table tab$subfix add constraint ck1 check (mod(id,4) = $subfix );"
done

查看

psql master <<EOF
\det
EOF

 List of foreign tables
 Schema | Table | Server 
--------+-------+--------
 public | tab0  | db0
 public | tab1  | db1
 public | tab2  | db2
 public | tab3  | db3
 public | tbl0  | db0
 public | tbl1  | db1
 public | tbl2  | db2
 public | tbl3  | db3
(8 rows)

在master库创建父表

psql master -c "create table tbl(id int primary key, info text);"
psql master -c "create table tab(id int primary key, info text);"

在master库创建foreign表和父表的继承关系

for subfix in 0 1 2 3 
do
psql master -c "alter foreign table tbl$subfix inherit tbl;"
psql master -c "alter foreign table tab$subfix inherit tab;"
done

测试JOIN的下推

master=# explain verbose select * from tbl1,tab1 where tab1.id=tbl1.id and mod(tbl1.id,4)=1;
                                                                     QUERY PLAN                                                                     
----------------------------------------------------------------------------------------------------------------------------------------------------
 Foreign Scan  (cost=100.00..226.75 rows=48 width=72)
   Output: tbl1.id, tbl1.info, tab1.id, tab1.info
   Relations: (public.tbl1) INNER JOIN (public.tab1)
   Remote SQL: SELECT r1.id, r1.info, r2.id, r2.info FROM (public.tbl r1 INNER JOIN public.tab r2 ON (((r1.id = r2.id)) AND ((mod(r1.id, 4) = 1))))
(4 rows)

目前sort下推需要关闭优化器enable_sort开关才会下推,也是值得改进的地方

master=# set enable_sort=off;
SET
master=# explain verbose select * from tbl1 where mod(id,4)=mod(100,4) order by id;
                                            QUERY PLAN                                             
---------------------------------------------------------------------------------------------------
 Foreign Scan on public.tbl1  (cost=100.00..136.71 rows=7 width=36)
   Output: id, info
   Remote SQL: SELECT id, info FROM public.tbl WHERE ((mod(id, 4) = 0)) ORDER BY id ASC NULLS LAST
(3 rows)


还需要改进的地方
这样的查询优化器能优化什么?
1. 如果要更纯粹的sharding,父表不应该参与计算,只是一个别名而已。因此JOIN 可以根据前提条件下推。
2. tab.id=tbl.id and mod(tbl.id,4)=1 可以推演出 and mod(tab.id,4)=1 。 因此tab表只需要扫描tab1。

master=# explain verbose select * from tbl,tab where tab.id=tbl.id and mod(tbl.id,4)=1;
                                           QUERY PLAN                                           
------------------------------------------------------------------------------------------------
 Gather  (cost=0.00..0.00 rows=0 width=0)
   Output: tbl.id, tbl.info, tab.id, tab.info
   Workers Planned: 1
   Single Copy: true
   ->  Hash Join  (cost=130.71..757.17 rows=218 width=72)
         Output: tbl.id, tbl.info, tab.id, tab.info
         Hash Cond: (tab.id = tbl.id)
         ->  Append  (cost=0.00..603.80 rows=5461 width=36)
               ->  Seq Scan on public.tab  (cost=0.00..0.00 rows=1 width=36)
                     Output: tab.id, tab.info
               ->  Foreign Scan on public.tab0  (cost=100.00..150.95 rows=1365 width=36)
                     Output: tab0.id, tab0.info
                     Remote SQL: SELECT id, info FROM public.tab
               ->  Foreign Scan on public.tab1  (cost=100.00..150.95 rows=1365 width=36)
                     Output: tab1.id, tab1.info
                     Remote SQL: SELECT id, info FROM public.tab
               ->  Foreign Scan on public.tab2  (cost=100.00..150.95 rows=1365 width=36)
                     Output: tab2.id, tab2.info
                     Remote SQL: SELECT id, info FROM public.tab
               ->  Foreign Scan on public.tab3  (cost=100.00..150.95 rows=1365 width=36)
                     Output: tab3.id, tab3.info
                     Remote SQL: SELECT id, info FROM public.tab
         ->  Hash  (cost=130.61..130.61 rows=8 width=36)
               Output: tbl.id, tbl.info
               ->  Append  (cost=0.00..130.61 rows=8 width=36)
                     ->  Seq Scan on public.tbl  (cost=0.00..0.00 rows=1 width=36)
                           Output: tbl.id, tbl.info
                           Filter: (mod(tbl.id, 4) = 1)
                     ->  Foreign Scan on public.tbl1  (cost=100.00..130.61 rows=7 width=36)
                           Output: tbl1.id, tbl1.info
                           Remote SQL: SELECT id, info FROM public.tbl WHERE ((mod(id, 4) = 1))
(31 rows)

PostgreSQL 9.6 支持等待事件统计了

$
0
0

PostgreSQL 9.6 统计信息收集进程pgstat,增加了等待事件信息的收集,并且用户可以获得backend的等待事件信息。

目前支持的等待事件分类如下
src/include/pgstat.h

/* ----------
 * Wait Classes
 * ----------
 */
typedef enum WaitClass
{
        WAIT_UNDEFINED,
        WAIT_LWLOCK_NAMED,
        WAIT_LWLOCK_TRANCHE,
        WAIT_LOCK,
        WAIT_BUFFER_PIN
}       WaitClass;

支持的获取等待事件类别和等待事件信息的函数
src/backend/postmaster/pgstat.c

/* ----------
 * pgstat_get_wait_event_type() -
 *
 *      Return a string representing the current wait event type, backend is
 *      waiting on.
 */
const char *
pgstat_get_wait_event_type(uint32 wait_event_info)
{
        uint8           classId;
        const char *event_type;

        /* report process as not waiting. */
        if (wait_event_info == 0)
                return NULL;

        wait_event_info = wait_event_info >> 24;
        classId = wait_event_info & 0XFF;

        switch (classId)
        {
                case WAIT_LWLOCK_NAMED:
                        event_type = "LWLockNamed";
                        break;
                case WAIT_LWLOCK_TRANCHE:
                        event_type = "LWLockTranche";
                        break;
                case WAIT_LOCK:
                        event_type = "Lock";
                        break;
                case WAIT_BUFFER_PIN:
                        event_type = "BufferPin";
                        break;
                default:
                        event_type = "???";
                        break;
        }

        return event_type;
}

/* ----------
 * pgstat_get_wait_event() -
 *
 *      Return a string representing the current wait event, backend is
 *      waiting on.
 */
const char *
pgstat_get_wait_event(uint32 wait_event_info)
{
        uint8           classId;
        uint16          eventId;
        const char *event_name;

        /* report process as not waiting. */
        if (wait_event_info == 0)
                return NULL;

        eventId = wait_event_info & ((1 << 24) - 1);
        wait_event_info = wait_event_info >> 24;
        classId = wait_event_info & 0XFF;

        switch (classId)
        {
                case WAIT_LWLOCK_NAMED:
                case WAIT_LWLOCK_TRANCHE:
                        event_name = GetLWLockIdentifier(classId, eventId);
                        break;
                case WAIT_LOCK:
                        event_name = GetLockNameFromTagType(eventId);
                        break;
                case WAIT_BUFFER_PIN:
                        event_name = "BufferPin";
                        break;
                default:
                        event_name = "unknown wait event";
                        break;
        }

        return event_name;
}


详细的等待信息归类和信息见手册
https://www.postgresql.org/docs/9.6/static/monitoring-stats.html

在pg_stat_activity动态视图中支持的等待事件字段信息如下
wait_event_type

The type of event for which the backend is waiting, if any; otherwise NULL. 
Possible values are:

LWLockNamed: 
The backend is waiting for a specific named lightweight lock. Each such lock protects a particular data structure in shared memory. wait_event will contain the name of the lightweight lock.

LWLockTranche: 
The backend is waiting for one of a group of related lightweight locks. All locks in the group perform a similar function; wait_event will identify the general purpose of locks in that group.

Lock: 
The backend is waiting for a heavyweight lock. Heavyweight locks, also known as lock manager locks or simply locks, primarily protect SQL-visible objects such as tables. However, they are also used to ensure mutual exclusion for certain internal operations such as relation extension. wait_event will identify the type of lock awaited.

BufferPin: 
The server process is waiting to access to a data buffer during a period when no other process can be examining that buffer. Buffer pin waits can be protracted if another process holds an open cursor which last read data from the buffer in question.

wait_event

Wait event name if backend is currently waiting, otherwise NULL. 
See wait_event for details.

等待事件的归类以及对应的等待信息解释
LWLockNamed

ShmemIndexLock  Waiting to find or allocate space in shared memory.
OidGenLock  Waiting to allocate or assign an OID.
XidGenLock  Waiting to allocate or assign a transaction id.
ProcArrayLock   Waiting to get a snapshot or clearing a transaction id at transaction end.
SInvalReadLock  Waiting to retrieve or remove messages from shared invalidation queue.
SInvalWriteLock Waiting to add a message in shared invalidation queue.
WALBufMappingLock   Waiting to replace a page in WAL buffers.
WALWriteLock    Waiting for WAL buffers to be written to disk.
ControlFileLock Waiting to read or update the control file or creation of a new WAL file.
CheckpointLock  Waiting to perform checkpoint.
CLogControlLock Waiting to read or update transaction status.
SubtransControlLock Waiting to read or update sub-transaction information.
MultiXactGenLock    Waiting to read or update shared multixact state.
MultiXactOffsetControlLock  Waiting to read or update multixact offset mappings.
MultiXactMemberControlLock  Waiting to read or update multixact member mappings.
RelCacheInitLock    Waiting to read or write relation cache initialization file.
CheckpointerCommLock    Waiting to manage fsync requests.
TwoPhaseStateLock   Waiting to read or update the state of prepared transactions.
TablespaceCreateLock    Waiting to create or drop the tablespace.
BtreeVacuumLock Waiting to read or update vacuum-related information for a Btree index.
AddinShmemInitLock  Waiting to manage space allocation in shared memory.
AutovacuumLock  Autovacuum worker or launcher waiting to update or read the current state of autovacuum workers.
AutovacuumScheduleLock  Waiting to ensure that the table it has selected for a vacuum still needs vacuuming.
SyncScanLock    Waiting to get the start location of a scan on a table for synchronized scans.
RelationMappingLock Waiting to update the relation map file used to store catalog to filenode mapping.
AsyncCtlLock    Waiting to read or update shared notification state.
AsyncQueueLock  Waiting to read or update notification messages.
SerializableXactHashLock    Waiting to retrieve or store information about serializable transactions.
SerializableFinishedListLock    Waiting to access the list of finished serializable transactions.
SerializablePredicateLockListLock   Waiting to perform an operation on a list of locks held by serializable transactions.
OldSerXidLock   Waiting to read or record conflicting serializable transactions.
SyncRepLock Waiting to read or update information about synchronous replicas.
BackgroundWorkerLock    Waiting to read or update background worker state.
DynamicSharedMemoryControlLock  Waiting to read or update dynamic shared memory state.
AutoFileLock    Waiting to update the postgresql.auto.conf file.
ReplicationSlotAllocationLock   Waiting to allocate or free a replication slot.
ReplicationSlotControlLock  Waiting to read or update replication slot state.
CommitTsControlLock Waiting to read or update transaction commit timestamps.
CommitTsLock    Waiting to read or update the last value set for the transaction timestamp.
ReplicationOriginLock   Waiting to setup, drop or use replication origin.
MultiXactTruncationLock Waiting to read or truncate multixact information.

LWLockTranche

clog    Waiting for I/O on a clog (transaction status) buffer.
commit_timestamp    Waiting for I/O on commit timestamp buffer.
subtrans    Waiting for I/O a subtransaction buffer.
multixact_offset    Waiting for I/O on a multixact offset buffer.
multixact_member    Waiting for I/O on a multixact_member buffer.
async   Waiting for I/O on an async (notify) buffer.
oldserxid   Waiting to I/O on an oldserxid buffer.
wal_insert  Waiting to insert WAL into a memory buffer.
buffer_content  Waiting to read or write a data page in memory.
buffer_io   Waiting for I/O on a data page.
replication_origin  Waiting to read or update the replication progress.
replication_slot_io Waiting for I/O on a replication slot.
proc    Waiting to read or update the fast-path lock information.
buffer_mapping  Waiting to associate a data block with a buffer in the buffer pool.
lock_manager    Waiting to add or examine locks for backends, or waiting to join or exit a locking group (used by parallel query).
predicate_lock_manager  Waiting to add or examine predicate lock information.

Lock

relation    Waiting to acquire a lock on a relation.
extend  Waiting to extend a relation.
page    Waiting to acquire a lock on page of a relation.
tuple   Waiting to acquire a lock on a tuple.
transactionid   Waiting for a transaction to finish.
virtualxid  Waiting to acquire a virtual xid lock.
speculative token   Waiting to acquire a speculative insertion lock.
object  Waiting to acquire a lock on a non-relation database object.
userlock    Waiting to acquire a userlock.
advisory    Waiting to acquire an advisory user lock.

BufferPin

BufferPin   Waiting to acquire a pin on a buffer.

EDB PPAS的"坑" 不兼容PostgreSQL一例

$
0
0

这样一段正常的兼容ORACLE的代码,在使用社区版本的psql连接到PPAS时,执行异常

postgres=> create table about_we (id int, info text); create sequence SEQ_ABOUT_WE_ID;

postgres=> CREATE OR REPLACE TRIGGER TRI_ABOUT_WE_ID BEFORE INSERT ON ABOUT_WE
FOR EACH ROW
BEGIN
  SELECT SEQ_ABOUT_WE_ID.nextval
  INTO :new.ID
  FROM dual;  
end;
ERROR:  42601: syntax error at end of input
LINE 6:   FROM dual;
                    ^
LOCATION:  scanner_yyerror, scan.l:1374

但实际上,语法是PPAS兼容ORACLE的语法,并没有问题。
原因惊人,竟然是PPAS在客户端psql上做了hack,来实现这一的语法兼容。
所以使用社区版本的psql是不行的,记住咯。
以后不要使用社区版本的psql连接PPAS了,否则就等着给自己挖坑吧。 请使用EDB自己的那套东西。
或者使用pgadmin,因为pgadmin号称兼容ppas。
https://www.pgadmin.org/

使用alidecode将RDS PG同步到线下, 或者将MySQL同步到PG

$
0
0

alidecode是RDS PG提供的一个逻辑复制插件,使用它,可以将RDS PG通过逻辑复制的方式,把数据同步到线下的PostgreSQL。
同时还支持将MySQL的数据同步到PostgreSQL。
目前alidecode还没有对外开放下载,敬请期待。
下面是使用方法。


准备工作,
提交工单,开放用户的replication角色。

postgres=# alter role digoal replication;
ALTER ROLE

阿里云的RDS PG需要将主备的pg_hba.conf进行修正,增加replication的条目。
例子

$ vi $PGDATA/pg_hba.conf
host replication digoal 0.0.0.0/0 md5

阿里云的RDS PG需要调整主备的postgresql.conf,将wal_level改成logical。
并重启主备数据库,所以用户要开通此功能,需要重启实例哦

wal_level = logical

用户需要在RDS管控平台,配置白名单,允许alidecode客户端所在的主机连接RDS数据库。

下载alidecode客户端。
安装postgresql, mysql。(需要用到头文件)
如果你不需要将mysql的数据同步到PG,则不需要编译mysql的部分。
在Makefile和dbsync.h中注释掉mysql的部分即可。

编译前,你需要配置一下pgsync.cpp,这里需要配置三个连接串。
src对应RDS的连接串。
local对应的是一个中间库,它用来记录任务信息,记录全量同步时的增量数据(全量同步数据时,并行的接收xlog,接收的XLOG转义成SQL存在中间库)。
desc对应目标库,即数据要同步到这个库。

$ vi dbsync.cpp 
        src =   (char *)"host=digoal_111.pg.rds.aliyuncs.com port=3433 dbname=db1 user=digoal password=digoal";
        local = (char *)"host=127.0.0.1 port=1925 dbname=db2 user=postgres password=postgres";
        desc = (char *)"host=127.0.0.1 port=1925 dbname=db1 user=postgres password=postgres";

编译
$ make

alidecode不负责DDL的同步,所以DDL需要用户自己操作
例子

/home/dege.zzz/pgsql9.5/bin/pg_dump -F p -s --no-privileges --no-tablespaces --no-owner -h digoal_111.pg.rds.aliyuncs.com -p 3433 -U digoal db1 | psql db1 -f -


同步数据,执行dbsync就可以了

./dbsync 
full sync start 2016-05-26 15:35:42.336903, end 2016-05-26 15:35:42.699032 restart decoder sync
decoder sync start 2016-05-26 15:35:42.337482
decoder slot rds_logical_sync_slot exist
starting logical decoding sync thread
starting decoder apply thread
pg_recvlogical: starting log streaming at 0/0 (slot rds_logical_sync_slot)
pg_recvlogical: confirming recv up to 0/0, flush to 0/0 (slot rds_logical_sync_slot)

元数据记录在db2,如果失败要重新来过的话,建议清除它,同时清除目标库的已同步数据,然后重新调用dbsync。

db2=# \dt
             List of relations
 Schema |      Name      | Type  |  Owner   
--------+----------------+-------+----------
 public | db_sync_status | table | postgres
 public | sync_sqls      | table | postgres
(2 rows)

db2=# drop table db_sync_status ;
DROP TABLE
db2=# drop table sync_sqls ;
DROP TABLE


压测rds

pgbench -M prepared -n -r -P 1 -c 80 -j 80 -T 100 -h digoal_111o.pg.rds.aliyuncs.com -p 3433 -U digoal db1

可以看到同步的过程

pg_recvlogical: confirming recv up to 1/4EE3F08, flush to 1/4EE3F08 (slot rds_logical_sync_slot)
pg_recvlogical: confirming recv up to 1/4F8BA20, flush to 1/4F8BA20 (slot rds_logical_sync_slot)
pg_recvlogical: confirming recv up to 1/5025228, flush to 1/5025228 (slot rds_logical_sync_slot)
pg_recvlogical: confirming recv up to 1/50C6E68, flush to 1/50C6E68 (slot rds_logical_sync_slot)
pg_recvlogical: confirming recv up to 1/51578A0, flush to 1/51578A0 (slot rds_logical_sync_slot)
pg_recvlogical: confirming recv up to 1/51E7CF8, flush to 1/51E7CF8 (slot rds_logical_sync_slot)


压测完后,查看数据是否一致

psql -h 127.0.0.1 db1
db1=# select sum(hashtext(t.*::text)) from pgbench_accounts t;
      sum      
---------------
 -582104340143
(1 row)

psql -h digoal_111o.pg.rds.aliyuncs.com -p 3433 -U digoal db1
psql (9.6beta1, server 9.4.1)
Type "help" for help.

db1=> select sum(hashtext(t.*::text)) from pgbench_accounts t;
      sum      
---------------
 -582104340143
(1 row)

PostgreSQL 自带自增字段 请勿使用触发器或其他手段生成(Like Oracle, MySQL)

$
0
0

在Oracle中,因为不能设置字段的default sequence.nextval,所以如果要设置自增字段,需要使用触发器。
例如:

create sequence seq;
create table test(id int, info text);
CREATE OR REPLACE TRIGGER tg1 BEFORE INSERT ON test
FOR EACH ROW
BEGIN
  SELECT seq.nextval
  INTO :new.ID
  FROM dual;  
end;

这种方式能在INSERT前,把id的值改成seq.nextval。
从而达到自增主键的目的。
但是它的开销太大,而且非常不友好。


PostgreSQL中,建议这样使用

test=# create table test(id serial, info text);
CREATE TABLE
test=# insert into test (info) values (1);
test=# insert into test (info) values ('test');
test=# select * from test;
 id | info 
----+------
  1 | 1
  2 | test
(2 rows)

或者这样

test=# create sequence seq;
CREATE SEQUENCE
test=# create table test(id int default nextval('seq'), info text);
CREATE TABLE

或者这样

test=# create table test(id int, info text);
CREATE TABLE
test=# alter table test alter column id set default nextval('seq');
ALTER TABLE

请初次接触PG,PPAS或者以前有MySQL, Oracle使用经验的童鞋注意咯。

注意PostgreSQL的关键字(保留字)和identified的用法和位置

$
0
0

关键字即词法解析时用到的一些固定的单词,identifier则是用户定义的一些名词(如表名,索引名,字段名,函数名等等)
PostgreSQL 有一张关键字列表
https://www.postgresql.org/docs/9.5/static/sql-keywords-appendix.html
在这个列表中的关键字,如果出现的位置可以是identified,则会报错。
https://www.postgresql.org/docs/9.5/static/sql-syntax-lexical.html#SQL-SYNTAX-IDENTIFIERS
例子:

postgres=# select 1 and;
ERROR:  syntax error at or near ";"
LINE 1: select 1 and;
                    ^

and就是一个关键字,并且他出现在了可以是identifer的位置,所以要解决这个问题就是加双引号,或者排除歧义。
使用双引号引排除歧义,把它变成别名identifier。

postgres=# select 1 "and";
 and 
-----
   1
(1 row)

使用as改变词法,排除歧义,把它变成别名。

postgres=# select 1 as and;
 and 
-----
   1
(1 row)

还有,如果key words出现在identifier位置时,还可能是定义名称的位置。
例子

postgres=# create table and (id int);
ERROR:  syntax error at or near "and"
LINE 1: create table and (id int);
                     ^
postgres=# create table "and" (id int);
CREATE TABLE

postgres=# drop table and;
ERROR:  42601: syntax error at or near "and"  -- 这里明确告诉你and错误了
LINE 1: drop table and;
                   ^
LOCATION:  scanner_yyerror, scan.l:1087
postgres=# drop table "and";
DROP TABLE

所以,如果你遇到类似的错误,用双引号,或者换名字即可。

Viewing all 253 articles
Browse latest View live